Metal Smith from Maryland

Introduce yourself here
Ranchero50
Posts: 4
Joined: Wed Mar 05, 2014 4:53 pm
10
Location: Hagerstown MD

Metal Smith from Maryland

#1

Post by Ranchero50 »

Hey guys, first post. Decided to join as I was looking for ideas for a project on my dad's Chris Craft Catalina 280. After owning it a couple years dad wanted to put some form of hard top on it as they use it for a weekender on the Patuxtent. So I started sketching a design that would compliment the original lines and still have enough headroom for a 6' guy to walk around.

Build thread... http://www.chriscraftcatalinaclub.com/s ... nd-install (hopefully cross linking is OK)
Image

Image

Image

I also have a slightly modified 1993 Alumacraft 1448MV that I stretched the nose 16", added 14" worth of pods, a center console and converted to Seadoo I/B jet power via a '95 Xp. It'll run 45 mph in 4" of water on the upper Potomac.

Build thread... http://www.tinboats.net/forum/viewtopic.php?f=21&t=8385

[BBvideo 560,340]http://www.youtube.com/watch?v=K71jhrikpoE[/BBvideo]

Image

Looking forward to being a positive part of this community.
Jamie
Chaps
Donator '09
Posts: 2246
Joined: Sun Jan 13, 2008 12:19 am
16
Location: Seattle, WA

Re: Metal Smith from Maryland

#2

Post by Chaps »

Nice project there, my dad had an Owens that looked like your Chris but his was wood. Is that one of the aluminum Chris Crafts or is it glass? Welcome to AAB BTW
1987 24' LaConner pilothouse workboat, 225 Suzuki
Image
please view and like: https://www.facebook.com/bottompainting/
Ranchero50
Posts: 4
Joined: Wed Mar 05, 2014 4:53 pm
10
Location: Hagerstown MD

Re: Metal Smith from Maryland

#3

Post by Ranchero50 »

It's glass, a '83 with a single 350 I/B. Heavy, slow and not efficient.

Goal for the top was to build something that could be removed to pull the engine out down the road. It's finally warming up so I hope to get back into it shortly.
kmorin
Donator 08, 09, 10, 11, 12, 13, 14, 15, 16, 17, 18, 19, 20, 21, 22, 23, 24
Posts: 1743
Joined: Mon Aug 18, 2008 1:37 am
15
Location: Kenai, Alaska

Cabin Lines

#4

Post by kmorin »

ranchero50

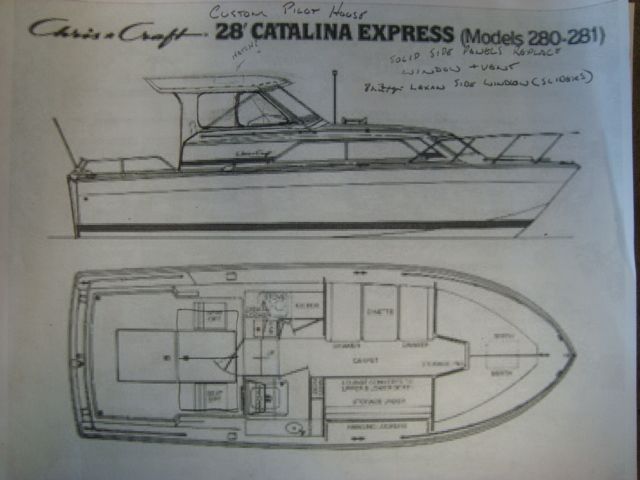
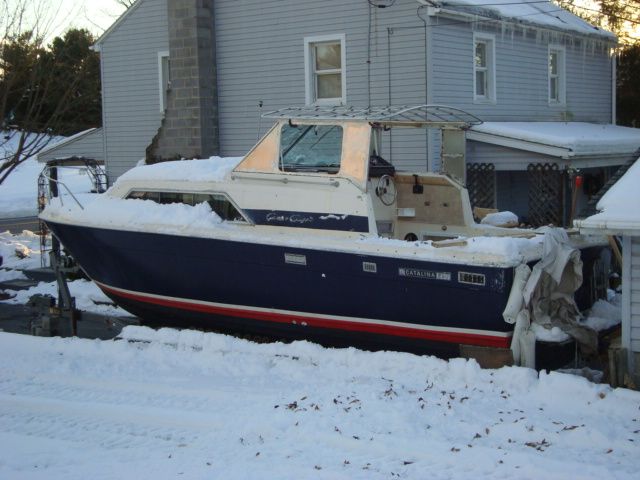
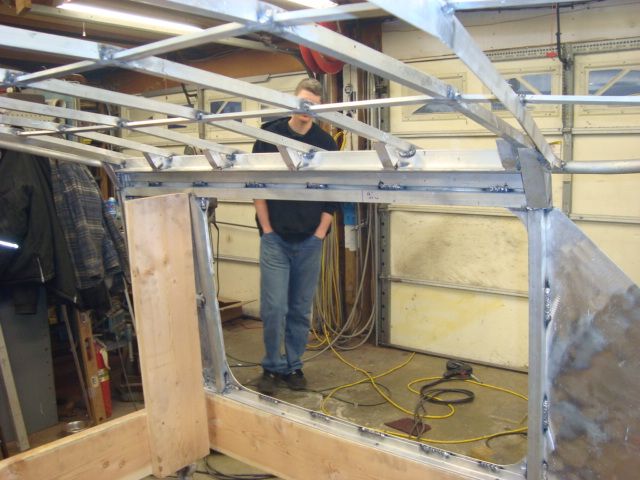
The project looks good structurally. Esthetically, I'd have liked the forward line of the side glass to rake with the overall windscreen. I like the sketch/scan of the cabin better with its raked forward line compared to the vertical line. I do like the brow overhang forward, this is often skipped by some metal builders or minimized to a very small overhang, and I prefer the look of the longer overhang as you have built. It will probably be a good idea to consider hand rails at two locations, one the top of the cabin to provide grip while walking along the sides of the cabin and the other vertically at the after cabin sides. Even while standing on deck in a sea, its very comfortable to have the vertical hand holds that could be welded to the after verticals of your project.

In the corners of metal cabins, lots of time we'll use hollow extrusion, pipe or even a pressed shape to create a column. Where the raked aft windscreen meets a side window or side panel, lots of times these will be sliders that are plenty expensive but even in Alaska considered worth the cost to get some air circulation in the cabin, the forward corner of the cabin becomes critical to hold the cabin loads. So a hollow element there is more rigid in both compression and deflection, and the hollow is where the wiring from helm level to the cabin top are run.

Fixed windows, especially using rubber extrusions to mount the glass, would look a little nicer on this boat if you used the white rubber. I realize the rubber extrusions are not widely stocked so often to get the lighter colored glazing mounts you have to order them and wait for the product.

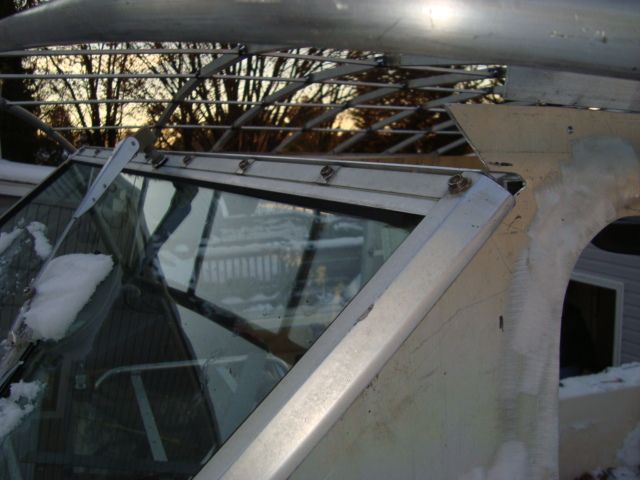
Cabin top hand rails are tough to do discretely as they can get a little obtrusive in design, but using 3/4" pipe and keeping the legs low (harder to weld under ) even raking the legs to match the windscreen's angle to the waterline, will make the railing more or less 'hide' in the background of the camber of the cabin top.

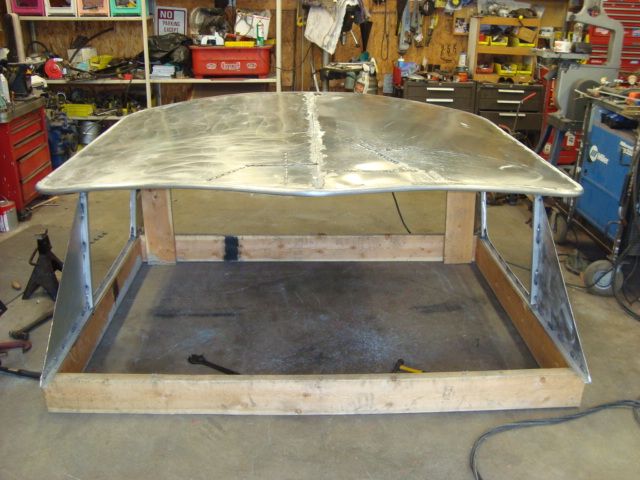
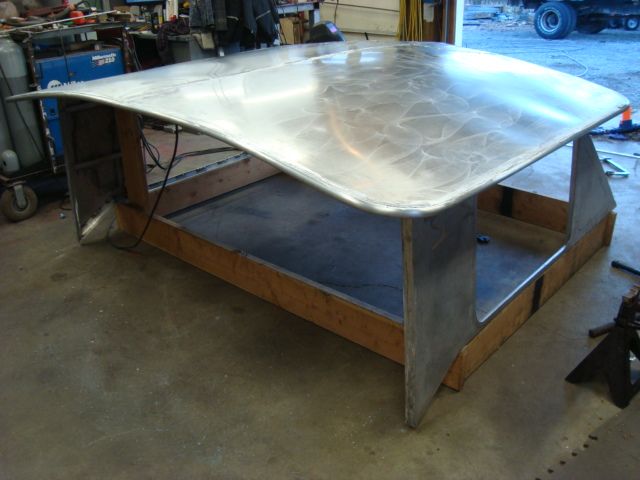
Nice choice of camber for this top, the rolled or formed framing and pipe shaping look nice, and help the cabin to stay relatively low profile while giving good head room. I like a longer after overhang, if possible just to make the shelter a little bigger but also to stretch the lines of that top in profile view.

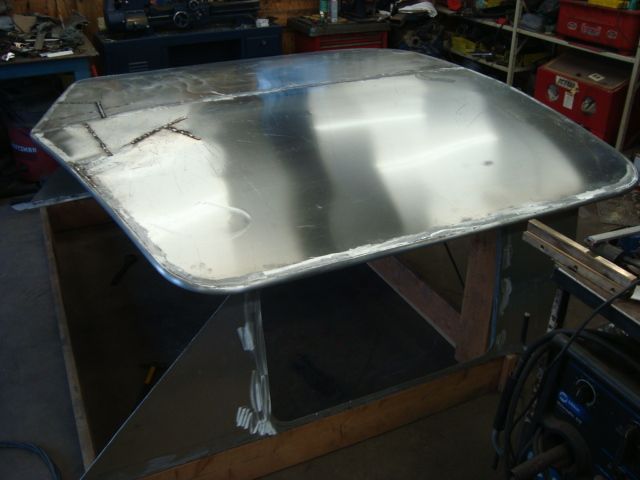
It looks like the cabin top framing elements are tangent to the perimeter pipe? That seems like a nicely designed feature so the to sheet can weld to the 12:00 tangent of the pipe, and that weld could be dressed to a paint finish without any loss of integrity. Depending on the running attitude of the hull and the local weather, the after end of a cabin top is often fitting with a vertical coaming to stop run off from dripping on the aft deck. The rain, spray or whatever water runs aft then the coaming ( only an inch or two tall) would divert the water to the outboard sides and from the guard deck or shear clamp (walk-around side decks) it will run off the boat instead of into the cockpit aft the cabin.

If the boat is fished regularly this coaming and a rod holder or 'rocket launcher' as some call the rod rack of raked tubes, are combined into one bench built fabrication then added to the cabin's after edge.

If a cabin is short, fore and aft, and has an almost full glass side panel to give the most visibility and openness, then the side-to-side structural stability can be a challenge. So boxing the forward windscreen corners will go a long way to take that sway out. An after bulkhead will do the same but an open aft house makes for a challenge. I most often make a press braked or welded from extrusions box of the after corners for this reason. I see an angle extrusion there on the after corners as near as I can make out in the images? You may consider a piece of 2" round corner square tubing to run from the cabin top to deck, just inboard, and aft a 1/2" of this angle to give A) a wider box section at the after cabin plane B) a lower bolting location instead of just the raised trunk cabin line of the glass bolted on top, you could connect the after 'post' at the deck and the inner hull sides- might have to add blocking? and C) this would round the corner, and give a fine stiff location for a hand rail.

Anyway, that's my 2 cents and Welcome to AAB.com

Your project looks good so far :thumbsup: and I think it's surely an improvement over an open boat or rag top of this size so; keep up the good work. Metal work on boats is more challenging than land based welding projects, that's for sure. Thanks for posting.

Cheers,
Kevin Morin
kmorin
Ranchero50
Posts: 4
Joined: Wed Mar 05, 2014 4:53 pm
10
Location: Hagerstown MD

Re: Metal Smith from Maryland

#5

Post by Ranchero50 »

Kevin, thank you for the reply. This project has been largely about compromise and consideration for how things will interact in use.

Per the angled windows in the front, I do want to add a small angled window, probably hinge opening. The trick is to design something that will look good and function with the surplus RV windows we ended up with. I tinkered with some self holding cabinet hinges but couldn't get the geometry to work out like I wanted. Currently the front of the roof above the windshield will be canvas enclosed. Part of why the front edge of the roof was extended was to shade the front greenhouse. Same for the sides although with the droop in the roof line it also hides how tall the side walls had to be. I tried to keep a constant radius for most of the roof so the top skins don't kick my butt too bad.
Image

There are hand welds designed into the bottom lip of the roof. Although the perimeter pipe is only 1", it gives decent support and with a 6" overhang does not push a person too far outboard. Use and duty for the boat is short trip cruising with overnighting at anchor 2 1/2 seasons in the river. The boat has been out in 4' chop in the main Chesapeake and it was not a fun experience.

One of my biggest concerns is keeping the house from racking. The roof sets into the side walls with a pin and socket setup and has to large flanges with through bolts to hold them together.
Image

I wanted to extend the rear further but that idea was overturned :) The plan there is to reuse the existing sunshade and snap it in place.

I'll post up some more when I get time. Again, thanks for your response.
Ranchero50
Posts: 4
Joined: Wed Mar 05, 2014 4:53 pm
10
Location: Hagerstown MD

Re: Metal Smith from Maryland

#6

Post by Ranchero50 »

Welp, here we are again. I'm not going to say this project stalled out but...

Yesterday I cleaned all the misc crap off of it at 3am when I woke up and started forming / welding the roof on.

Image

Image

Image

Overall things went really well on the starboard side but the port side decided to fight. I ended up with a lot of stress in the front lips and have been working to relieve it today. The whole front lip raised up from the top center line weld pulling the metal up. There was some judicious sledge hammer usage to get the form to come back. I also had to weld in some backers for the front lip to hold the metal form. I still have some oil drumming that I have to weld in place and then a ton of hammer / dolly work on the front edge to get it tuned in. Then acid etch, primer and body work to fair it out as much as possible.
User avatar
welder
Site Admin
Posts: 4668
Joined: Thu Jan 03, 2008 11:51 pm
16
Location: Whitesboro, Texas
Contact:

Re: Metal Smith from Maryland

#7

Post by welder »

I really like watching people use their hands, looking good. :thumbsup:
Lester,
PacificV2325, Honda BF225
2386
Post Reply Previous topicNext topic