
I am looking at getting a wormdrive saw for alum sheet cutting. There are lots to choose from, anyone have some personal recommendations? Skil, Dewalt, Milwaukee etc. Are any of the models more or less suitable for boatbuilding?
Alan
Worm drive
-
kmorin
- Donator 08, 09, 10, 11, 12, 13, 14, 15, 16, 17, 18, 19, 20, 21, 22, 23, 24
- Posts: 1743
- Joined: Mon Aug 18, 2008 1:37 am
- 15
- Location: Kenai, Alaska
Re: Worm drive
alan, I prefer the hypoid saw (same configuration different gears) from Makita. http://www.homedepot.com/p/Makita-7-1-4 ... /202035104 and I use UHMW tape on the table. http://uhmwtape.com/
This saw seems to cut well with low chatter (blade vibration harmonics that can de-stablize the blade's rotation plane) that I've seen in some blades and saws with worm gears, and I like the wt and feel, I've used one for a decade or two (not sure when they first came on the market) and have one that is older and one that is newer.
I use these Freud blades but not this size in a hand saw, just the non-ferrous type and I spray them with 'pam' generic brand, frying pan anti-stick spray before and while cutting. This material will clean up with acetone, then if any trace is left, accidentally, it vaporizes at a much lower temp than any petroleum product.
I only set the saw to the depth of the cut PLUS about 1/16- to 1/8" and I arrange all cuts so the sheet/plate is clamped onto a pieces of 2'by wood, I call cutting boards. I use this to back the cut, cleaning the tips of the carbide inserts, reducing blade wobble and stopping the saw from 'bridging' that can happen if the material being cut is not fully supported right at the blade's kerf.
The only thing I don't like about this is the handles' positions when cutting. I add a lower handle to the saw's table. This handle is to put one hand on each side of the blade so that I'm not holding the saw only from the top. I use the saw's 'rip fence' which is a T shaped piece of metal that fits into a 1/2" x 1/8" slot in the front of the table. This fence bar, then extends out to the left of the table and allows me to attache a vise grip, or a welded on handle attachment point. For example, you could take a spare electrical drill screw-in handle and thread that handle into the vertical of a nut welded to the saw's rip fence T. Then you'd have a vertical handle about 1-2" off to left of the blade in a hand vertical position similar to the trigger grip at the back of the saw.
I think increased control of the tool is gained by this handle addition, and I think the overall safety is increased as well since the force of the saw's resistance is then between your hands in the 'work circle' and not off to one side as is the case when the saw's native handles are used which are both more or less on one side of the blade.
To mark aluminum curves, I use the hull extrusions or buy specific 'battens' just for this purpose for each boat. By doing an X,Y layout of the offsets along a panel outline curve (scaled up to full size from whatever modeling or offsets given) I make the first mark in black permanent marker. Then using a pc of tungsten shapened to a fine point, I strike a scribed or incised line into the aluminum sheet/plate at the very edge of the black ink mark.
Now when the batten is removed a high contrast shiny 1/128th" wide line is visible with a black background for contrast. I then position a halide type, super bright work light in front of the area to be cut but off to one side so the blade kerf will be visible inside the saw table cutout. In this way I can (even and old guy like me) cut to a plus or minus 1/32" line along the scribed line by having the high contrast and exactly laid down line visible.
I end up crawling on the sheet if the cuts are not within reach of a man standing along the sides while the sheets are on saw horses backed by the 'cutting boards'. I use knee pads and keep an air hose with me as I move along to blow the shavings off in front of the saw, if I have a helper, then I leave the hose with them and ask that they keep the shavings out of the way to avoid getting them under the saw table or my knees and making a mess of the surface when its not needed.
If possible, I arrange each saw cut so I an work the tool outside the cut (to the right of the finished material) so the near side (to me) of the blade of the left side of the blade is along the right side of the scribed line. I find this to give the best control and site picture where I have the rectangular kerf's leading edge following the scribe line and the cut/kerf/removed metal is 'in the black' and outside the finished material.
I use several cross sections and lengths to quickly fair a cut, deburr the sides to a micro bevel so there is not 'curl' on the sheet edges and like a 'long board' on body work to create a nice fair and cleanly cut metal edge for welding.
Now, when the cut is done if there are 'black areas' I know they need to be filed with the Vixen file to dress this cut to a final edge. IF there are places where I can't see the scribed line at all, then I know to keep the file out of those areas as they are already slightly 'into' the finished material's intended outline.
Hope this (overly detailed) explanation of how to cut sheet with a skill saw is helpful in your consideration of tools and tool use for your build.
Cheers,
Kevin Morin
Kenai, AK
kmorin
-
aluminumdreamer

- Donator '10
- Posts: 369
- Joined: Sat Apr 25, 2009 8:45 pm
- 14
Re: Worm drive
I think I'm following the saw setup, but do you happen to have a photo of the actual saw? Sounds like a second handle is pretty key to having good control... When I finally build, I plan on cutting everything with a circular saw so I'd like to get all the info I can.
Slightly off topic, but do you (Kevin) have any suggestions on a brake or means of bending 3/16" sheet (less expensive the better)? I've been looking around a bit. I'd like to get something for the shop to maybe build some center console and such, so something to bend a sheet up to 3' wide?
Thanks for all the info and help!
Nate
Re: Worm drive
I work wood, not alloy--but I am a big fan of the Skill model 77 worm drive. They make a special edition out of magnesium that is a couple pounds lighter than the standard. I recommend the magnesium version. I've tried the makita hypoid drive and I thought it was too jumpy--it lurches and bounces around when you pull the trigger. But, that was a decade ago, and it might be better these days.
Cheers,
Mike
Cheers,
Mike
Re: Worm drive
Thanks every one for the replies. Kevin, it would be great if you had a pic of the extra handle in action. It is very generous when some one with substantial hard earned experience is willing to share that knowledge. It sure goes a long way to steepen the learning curve for those of us starting out! At school, we still use layout blue to aid in more accurate layout on metal, but I had not thought to apply the same principle to skill saw and aluminum plate.
Regards,
Alan
Regards,
Alan
-
kmorin
- Donator 08, 09, 10, 11, 12, 13, 14, 15, 16, 17, 18, 19, 20, 21, 22, 23, 24
- Posts: 1743
- Joined: Mon Aug 18, 2008 1:37 am
- 15
- Location: Kenai, Alaska
Re: Worm drive
alumd'mr, I have built a couple of brakes but no pics that I can find, (old days) but I will post a link of the first one I did from a booklet. I increased the size radically and beefed up the entire set of dimensions but it worked and still works as near as I know, I even put hydraulics on it and made the entire brake powered!
this 'bench top' unit was scaled up so the fold leaf was a boxed in 6"x6"x5/8" W that was 60" long and to use this brake we had to get on it, climb up and jump off with 2" steel pipe 'arms/handles' that were 6' long. When we used it for 3/16" and 1/4" it bent the leaf and hold down die but it worked, I build a couple hundred skiffs with this brake.
Napa, I agree the saw has huge initial torque, I just start it up with one hand and let it tip then lay back down, so when its turning I can enjoy that greater torque from the hypoid over the worm gear set. I've just gotten used to the high starting torque as the price I pay for the power.
Alan, the reason Welder and Co. mounted the site is to allow folks who have made sufficient mistakes to be considered 'experienced' to share that experience with those who may (then) be fortunate enough to avoid some of the mistakes others have made. That includes building boats, buying, selling and running and fishing these boats. The only cost is to listen and ask more questions and it is considered well mannered to post images of your results so that the next guy learning is that much father ahead.
I'm glad to offer a short dialog on the countless mistakes I've made, so that with Welder's kind facility, we're able help those who may have 'ears to hear' gain without as much cost to their education. Its still going to cost you plenty but hopefully there is some savings.
Gentlemen: I do not have one of the saws ready to hand and getting to the stored tools is not a 2 minute exercise so, I'll look up one of the saws and get some pics soon as possible. In the mean time
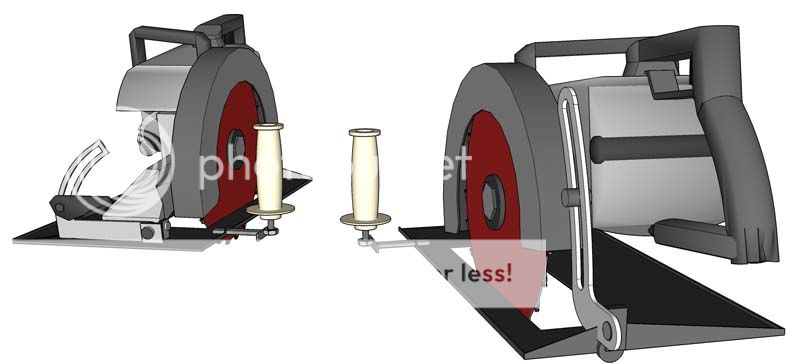
Here is an image of cut and paste objects that are arranged the way the removable handle works. The nut ,Tigged to the T -rip-fence needs to be whatever thread the handle you use needs; CAUTION lots of drills have the 'commie-metric' threads so make sure you thread the nut to the handle at the hardware store B E F O R E!!!! you TIG the nut to the fence (shown and used upside down). A large bolt will work fine and if you're dedicating the saw to the Miracle Metal then... the nut can be welded to the table of the saw. Worst case, go to the metal supplier and just get a strap of flat bar that is the cross section of the table's rip fence recess and bend the strap up!!!
[It is not hard to get a handle here, and why there is not provision from the manufacturers of these saws is a mystery to me, I've been doing this since 1976.]
Note the fence here in this illustration is just a place holder, yours may be different so be aware if you stick it out to the left too much, it will flex and give headaches. (also) It is not unreasonable to put a vacuum hose at the back of the table to help collect the chips, and this can be done with RedGreenWelding.
Napa Mike, you need to give up the 'cellulose thing' and come over to the Light Metal Side, its shiny, clean, and strong and you get to use fire to fuse it together, this is good- very good, dead plants are OK, inside the cabin, but should be resisted whenever metal can be used.
How I Was Raised in Rural Alaska:
I worked with several groups of men closer to my grandfather's age than my father's and learned several trades from them. Both in wooden boats (local cannery carpenters and fishermen) and in metal working, (local one man shop, WWII ship yard welder) I was taught to treat my education as my own personal responsibility and to assume that I should pay for what they gave me; I swept and hauled, held and fetched when I was able but when old enough I did all that AND I made sure there was fermented and distilled adult beverages for the 'journeymen'. It was considered good manners and my father would have been ashamed to think I was rude to these gentlemen who were giving me an 'education' (I dropped out of engineering college).
We can't all send Welder a case of beer or a quart of fine Pappy Van, but we can call donate to the site's overhead. When and if the cost of this site is not met by contributors or ads, Welder, who never says a word about it covers the difference between what comes in and what has to go out so the site is here.
I contribute regularly to the AAB.com because I think it's just like taking time to stop off for a case or two when I'm going to a shop where I'm going to ask a favor to get time on their shear or other equipment. If you're reading what Welder's efforts have provided you and you saved a little cost maybe avoided something that you may have had to learn like I did, I hope you'll consider becoming a donator to the cost of keeping AAB.com online?
Besides my pitch for donations; I hope this helps the saw discussion a little bit?
Cheers,
Kevin Morin
Kenai, AK
kmorin
Re: Worm drive
one of these days Kevin, when I "retire" I'll make the move from wood to alloy. I'd love to have the skills to trick out my boat like goatram!
Mike
Mike
-
welder

- Site Admin
- Posts: 4668
- Joined: Thu Jan 03, 2008 11:51 pm
- 16
- Location: Whitesboro, Texas
- Contact:
Re: Worm drive
Thank you Kevin. 
I vote for the Skill M77, I have used mine with a cheap 24 tooth blade installed backwards to cut a BUNCH of R-Panel [ steel sheet metal ] now for 1/4" Alloy i would use a Carbide Blade with as many teeth on in as I could get, i want to say around 48 teeth on the 7 1/4" blade.
The M77 is a worm drive saw that pulls about 14 Amps, it has loads of Torque to keep moving, let the saw do the job and hang on for the ride. The M77 is a RIGHT HANDED saw as the blade is on the left side so it's easy to use.
It also has a good torque twist when it's started so keep the blade away from the work until is calms down and of course with all that torque the kick backs can be brutal so be prepared. The best way to avoid the kick backs is to have your work well supported, parent metal and the drop.
And you WILL learn the importance of safety glasses and a face shield when cutting metal with a Skill Saw.

Lester,
PacificV2325, Honda BF225
2386
PacificV2325, Honda BF225
2386
-
goatram

- Donator 08, 09, 10, 11, 12, 13, 14, 15, 16, 17, 18, 19
- Posts: 1959
- Joined: Wed Apr 09, 2008 11:53 pm
- 16
- Location: Stanwood WA
Re: Worm drive
Them small Chips stick and can cause some minor bleeding. Just saying from experience. Been down that road and felt the pain. The 1/4" die grinder to clean the edges with an aggressive burr bit spreads sharp slivers that get into your shirt pockets for more fun later.
I use an old 1967 Metal Craftsmen Circular Saw my Father bought New. Them Carbide teeth cause blood loss as well.
I use an old 1967 Metal Craftsmen Circular Saw my Father bought New. Them Carbide teeth cause blood loss as well.
John Risser aka goatram
33' RBW with twin 250 Hondas (Aliens)
2015 Ford F350 Dually
Master of R&D aka Ripoff and Duplicate
33' RBW with twin 250 Hondas (Aliens)
2015 Ford F350 Dually
Master of R&D aka Ripoff and Duplicate
-
kmorin
- Donator 08, 09, 10, 11, 12, 13, 14, 15, 16, 17, 18, 19, 20, 21, 22, 23, 24
- Posts: 1743
- Joined: Mon Aug 18, 2008 1:37 am
- 15
- Location: Kenai, Alaska
Aluminum Cutting Chips
goatram, I agree, hot aluminum saw kerf chips can stick and burn while they cool off on your hide. I use a set of goggles inside a face shield to protect the eyes.
I had a guy working for me years ago, and he was cutting with just safety glasses (snug fitting but not sealed) and he got a chip inside this glasses and burned a little blister on his eyelid that took a while to heal. We figured the chip hit his forehead and bounced under the glasses? The eye was swollen and sore for a long time while that burned healed, and every time I looked at him I was thankful that hot chip didn't get in the eye below the lid.
I wear long sleeves buttoned, gloves that cover the wrist and hands, and if I'm going to use the carbide burr overhead or up above the shirt pockets; I personally tape my collar up with masking tape. I've had to go home and shower to get clean of shavings down the collar before, so I tape up before using that tool up high or overhead so I have a seal around my neck and skin to keep those shavings out of my clothes.
Last but not least, I use the poured-in or cast custom ear plugs inside head phones, (can be bought online) I've got some hearing loss from relying on foam plugs (db23-28) and they just weren't enough. The whine of the saw varies with blades and I find the Diablo as quiet as any blade I've used. But I still put in the cast ear plugs, and phones over those to get a db45 or so reduction. (I can hear the saw's cut but not more than a distant hum.)
Cheers,
Kevin Morin
Kenai, AK
kmorin
-
kmorin
- Donator 08, 09, 10, 11, 12, 13, 14, 15, 16, 17, 18, 19, 20, 21, 22, 23, 24
- Posts: 1743
- Joined: Mon Aug 18, 2008 1:37 am
- 15
- Location: Kenai, Alaska
Dressing Aluminum Welds and Rough Grinding
We've discussed cutting aluminum with a skill saw, and welder has shown a good Diablo brand non-ferrous cutting blade.
Here I will introduce another use for saw blades but only with this word of caution. If you are not familiar with power tools they can all be dangerous because they required good practice no matter who uses them. Even a seasoned tool user, carpenter or welder or other full time tradesman can have an accident using power tools and 95% of those are totally avoidable if the user were to plan the use, and think about the tools potential problems.
I have held a grinder in the welding trades since the 1970's and I'm writing to other experienced tradesmen, and AAB.com is NOT making a suggestion for those just getting started in metal work- this is my personal opinion offered for the education of other experienced tool users.
I use power tools to cut, grind, sand and weld aluminum, so do the people that build welded aluminum boats and so do many of the readers and posters here at the AAB.com Forum. If you are just starting to work metal and if you cannot honestly say you have at least a couple hundred hours in metal work please realize that this post may not be for you. This shows a professional skill level tool, in fact it shows modifications to a power tool and re-purposing this tool may be dangerous for inexperienced tool users.
Lots of aluminum welds need to be removed during repairs and modifications to boat, lots of bars, angles and even pipes need to be beveled to prepare for welding by forming a profile or cross section on the end of the piece allowing the weld to be optimized. When some plates/sheets and other aluminum shapes are welded together, the weld may penetrate (sometimes called "sagging through") and this bulging back side of the weld is removed by back gouging to prepare to weld the other side of many hull seams.
There are no real purpose-built tools to do SOME of these procedures in aluminum boat building. There are many power tools that can and are regularly used to do all these tasks, the following tool is for people who work aluminum all the time, and not as much a recommendation for the weekend, hobby, garage, once in a while fabricator.

Yes, this is a set of three 4" saw carbide saw blades mounted on a 4" grinder and the tool is common in the NW boat shops, even if they're hidden today when a safety inspector may be in the shop) known as a 'widowmaker' even though I don't personally know anyone who's been injured by this tool. I'm sure, just like a skill saw of all sizes that injury is possible. The factory guard has been welded to add extensions at both ends. A curved piece of steel is welded to the guard,at each end, to further limit the blade's depth of cut and access to material. The lower guide (add-on piece) has a piece of UHMW tape on it so the tool will glide without hanging up or dragging or scratching on aluminum. This allows the tool to be adjusted by the operator, by tilting to the correct angle and pulled along a weld to back chip with extreme control and precision.
The three saw blades have the teeth staggered so the distance between teeth is small but no one tooth is 'loaded up' or cutting very much on its own. This arrangement will glide along the metal and 'float' a bit so small depths of cuts can be taken by clean cuts and not impregnate the weld area as with sanding, grinding or other methods of cutting. This makes weld preparation very fast and controllable.

Either end guard extension can be used to pivot the tool to sort of mill off aluminum without grabbing the metal, as the teeth cannot dig in and therefore grab the tool way from the operator. The three blades' teeth together form a wide cutting surface so this cutting arrangement stops the tool digging in due to the next tooth being both outside or next too it predecessor and yet very close. This image shows the guard -one end extension with the tape- and the other is a segment of small section angle rolled to the radius of the guard. Both extensions are just TIGged to the original steel guard.

A slightly different angle image- to show the teeth arrangement and illustrate how the tool's cutting edge 'floats' or is lifted out of the metal by the fact there are lots of teeth to close to one another, so they don't grab the metal as on blade alone can do.
This tool is not for the unskilled but if treated with respect, a good fitter will find this a fine tool to put in weld bevels, end dressing and weld prep gouging as well as heavy grinder jobs where cutting out metal can be done without sanding and the resulting massive weld zone clean up.
AAB.com does not recommend you assemble this tool or use it in any manner outside your personal skill set. People that work in metal all day handle tools much more dangerous and potentially injurious than this every day. This tool has specific uses and if you do not understand them well enough to recognize its purpose and the obvious safe use of this type of power tool for carefully cutting aluminum alloy shapes and weldments? (Then) that self-test indicates this tool is not for you- avoid it.
The builders will all be very happy with the results if they assemble on for the jobs mentioned. I hold the gear case in my right hand the body of the tool with the other and only use the thread in handle if the space allows that handle. I have also rigged D handles for this rig but again space often makes a hand grip of the tool necessary for my uses. I place the back (maybe the 'heel' of my hand) of my right hand on the material, and hold the gear case between my thumb and first two fingers and rarely find any cut that takes more than those three fingers to hold the tool while cutting.
Cheers,
Kevin Morin
Kenai, Ak
Here I will introduce another use for saw blades but only with this word of caution. If you are not familiar with power tools they can all be dangerous because they required good practice no matter who uses them. Even a seasoned tool user, carpenter or welder or other full time tradesman can have an accident using power tools and 95% of those are totally avoidable if the user were to plan the use, and think about the tools potential problems.
I have held a grinder in the welding trades since the 1970's and I'm writing to other experienced tradesmen, and AAB.com is NOT making a suggestion for those just getting started in metal work- this is my personal opinion offered for the education of other experienced tool users.
I use power tools to cut, grind, sand and weld aluminum, so do the people that build welded aluminum boats and so do many of the readers and posters here at the AAB.com Forum. If you are just starting to work metal and if you cannot honestly say you have at least a couple hundred hours in metal work please realize that this post may not be for you. This shows a professional skill level tool, in fact it shows modifications to a power tool and re-purposing this tool may be dangerous for inexperienced tool users.
Lots of aluminum welds need to be removed during repairs and modifications to boat, lots of bars, angles and even pipes need to be beveled to prepare for welding by forming a profile or cross section on the end of the piece allowing the weld to be optimized. When some plates/sheets and other aluminum shapes are welded together, the weld may penetrate (sometimes called "sagging through") and this bulging back side of the weld is removed by back gouging to prepare to weld the other side of many hull seams.
There are no real purpose-built tools to do SOME of these procedures in aluminum boat building. There are many power tools that can and are regularly used to do all these tasks, the following tool is for people who work aluminum all the time, and not as much a recommendation for the weekend, hobby, garage, once in a while fabricator.
Yes, this is a set of three 4" saw carbide saw blades mounted on a 4" grinder and the tool is common in the NW boat shops, even if they're hidden today when a safety inspector may be in the shop) known as a 'widowmaker' even though I don't personally know anyone who's been injured by this tool. I'm sure, just like a skill saw of all sizes that injury is possible. The factory guard has been welded to add extensions at both ends. A curved piece of steel is welded to the guard,at each end, to further limit the blade's depth of cut and access to material. The lower guide (add-on piece) has a piece of UHMW tape on it so the tool will glide without hanging up or dragging or scratching on aluminum. This allows the tool to be adjusted by the operator, by tilting to the correct angle and pulled along a weld to back chip with extreme control and precision.
The three saw blades have the teeth staggered so the distance between teeth is small but no one tooth is 'loaded up' or cutting very much on its own. This arrangement will glide along the metal and 'float' a bit so small depths of cuts can be taken by clean cuts and not impregnate the weld area as with sanding, grinding or other methods of cutting. This makes weld preparation very fast and controllable.
Either end guard extension can be used to pivot the tool to sort of mill off aluminum without grabbing the metal, as the teeth cannot dig in and therefore grab the tool way from the operator. The three blades' teeth together form a wide cutting surface so this cutting arrangement stops the tool digging in due to the next tooth being both outside or next too it predecessor and yet very close. This image shows the guard -one end extension with the tape- and the other is a segment of small section angle rolled to the radius of the guard. Both extensions are just TIGged to the original steel guard.
A slightly different angle image- to show the teeth arrangement and illustrate how the tool's cutting edge 'floats' or is lifted out of the metal by the fact there are lots of teeth to close to one another, so they don't grab the metal as on blade alone can do.
This tool is not for the unskilled but if treated with respect, a good fitter will find this a fine tool to put in weld bevels, end dressing and weld prep gouging as well as heavy grinder jobs where cutting out metal can be done without sanding and the resulting massive weld zone clean up.
AAB.com does not recommend you assemble this tool or use it in any manner outside your personal skill set. People that work in metal all day handle tools much more dangerous and potentially injurious than this every day. This tool has specific uses and if you do not understand them well enough to recognize its purpose and the obvious safe use of this type of power tool for carefully cutting aluminum alloy shapes and weldments? (Then) that self-test indicates this tool is not for you- avoid it.
The builders will all be very happy with the results if they assemble on for the jobs mentioned. I hold the gear case in my right hand the body of the tool with the other and only use the thread in handle if the space allows that handle. I have also rigged D handles for this rig but again space often makes a hand grip of the tool necessary for my uses. I place the back (maybe the 'heel' of my hand) of my right hand on the material, and hold the gear case between my thumb and first two fingers and rarely find any cut that takes more than those three fingers to hold the tool while cutting.
Cheers,
Kevin Morin
Kenai, Ak
Last edited by kmorin on Fri Jun 27, 2014 9:52 pm, edited 1 time in total.
Reason: location typo
Reason: location typo
kmorin
-
goatram
- Donator 08, 09, 10, 11, 12, 13, 14, 15, 16, 17, 18, 19
- Posts: 1959
- Joined: Wed Apr 09, 2008 11:53 pm
- 16
- Location: Stanwood WA
Re: Worm drive
A Meat Axe is another name for the above tool. Metabo Tools has a Grinder with a brake on it; When you release the paddle the blade stops QUICK. I buy a Japanese made Blade for the Air Powered unit in my shop. In a Skilled hand it makes short work of removing metal. But it can take to much quick as well. I like the three blades on yours Kevin. The blades I Buy they ost about $25 apiece and we use them till about 4 teeth are missing and then toss. The Table Saw the samething when more than 4 teeth end up missing it will kick parts back at you. Hince the part about the Carbide teeth cause blood loss.
John Risser aka goatram
33' RBW with twin 250 Hondas (Aliens)
2015 Ford F350 Dually
Master of R&D aka Ripoff and Duplicate
33' RBW with twin 250 Hondas (Aliens)
2015 Ford F350 Dually
Master of R&D aka Ripoff and Duplicate