
What do you guys do to prevent major distortion of the welded material. Thanks in advance.
cheers
Welding aluminum
-
Brettmpriest
- Posts: 3
- Joined: Tue Nov 22, 2011 4:55 pm
- 12
Re: Welding aluminum
One of the biggest things I've found is to take time with your tack welds as well as metal preparation. The aluminum oxide layer on top of the material melts at a much high temp then the aluminum which can cause excess heat to be applied to break through the oxide layer. a good cleaning with a dedicated stainless brush or wheel can make a world of difference.
Lousy little tack welds will not hold. Also, there is a technique called back stepping where if you had a 24" weld, and were traveling from right to left, would weld the last say 4" first. Then start back 4" from your previous weld (which is 8" total in) and weld the next four from right to left. Repeat. Repeat. Repeat.
Don't be in a hurry with aluminum. Let it cool a bit when applying higher amps to it. Not to room temperature but around 200 or so will give you a bigger heat window to work with when you start applying heat. Also, brass is a great heat sink if you can get your hands on a nice thick piece and put it behind your work material. It won't melt or stick and can make a hard weld much easier.
This is what I learned over the 81# of .035 5356 wire I used in building my 23' sled. Hope that helps!

2014 Hand Crafted Fish-getter
-
welder
- Site Admin
- Posts: 4668
- Joined: Thu Jan 03, 2008 11:51 pm
- 16
- Location: Whitesboro, Texas
- Contact:
Re: Welding aluminum
Brett, we need to see more pictures of your fishing machine, can you post up some? 
Lester,
PacificV2325, Honda BF225
2386
PacificV2325, Honda BF225
2386
Re: Welding aluminum
Brettmpriest
Thank you for the reply, great first post and let me be the first to welcome you here.
I had welded some 1/8 for about 4ft. It started as a square panel and by the time I was done, well, I could not get the bolt holes to match. Bit frustrating to say the least LOL
Definitely going to try it the way you suggested
Cheers,
Adrian
as Welder suggested we LOVE pics of boats around here
-
Brettmpriest
- Posts: 3
- Joined: Tue Nov 22, 2011 4:55 pm
- 12
Re: Welding aluminum
Thank you both for the nice welcome... as they'd say on the radio "long time listener, first time caller".
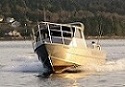
I am not a welder by trade but have always been a hands on type of person. My wife says I should have started with a smaller boat but I'm overall pleased with what came out of basic plans from Glen-L Marine's website. The boat is loosely based on the Jetsetter.
Specs:
5086-H116 .250 Bottom and Transom (72" wide)
5086H-116 .188 sides (36" height)
12 degree bottom
2014 (newly added) Evinrude 250HO 20" w/ 4 blade 19p SS Prop
6" Offset Atlas Hydraulic Jack Plate
2006 Suzuki 15 hp kicker 20"
104 gallon fuel tank (not normally full)
Here are a few build pics and then some of the more completed project (something like this is never truly complete) LOL


[imge]https://fbcdn-sphotos-c-a.akamaihd.net/ ... 3b43147b8b[/img]


Hopefully that wasn't too many. I've learned more from my mistakes then anything else. I have ideas in my head for an 18' flat bottom Jet boat as well as a large catamaran (think Alaska Inside Passage) down the road... dream big and see what comes of it :)
I am not a welder by trade but have always been a hands on type of person. My wife says I should have started with a smaller boat but I'm overall pleased with what came out of basic plans from Glen-L Marine's website. The boat is loosely based on the Jetsetter.
Specs:
5086-H116 .250 Bottom and Transom (72" wide)
5086H-116 .188 sides (36" height)
12 degree bottom
2014 (newly added) Evinrude 250HO 20" w/ 4 blade 19p SS Prop
6" Offset Atlas Hydraulic Jack Plate
2006 Suzuki 15 hp kicker 20"
104 gallon fuel tank (not normally full)
Here are a few build pics and then some of the more completed project (something like this is never truly complete) LOL
[imge]https://fbcdn-sphotos-c-a.akamaihd.net/ ... 3b43147b8b[/img]
Hopefully that wasn't too many. I've learned more from my mistakes then anything else. I have ideas in my head for an 18' flat bottom Jet boat as well as a large catamaran (think Alaska Inside Passage) down the road... dream big and see what comes of it :)
2014 Hand Crafted Fish-getter
-
kmorin
- Donator 08, 09, 10, 11, 12, 13, 14, 15, 16, 17, 18, 19, 20, 21, 22, 23, 24
- Posts: 1743
- Joined: Mon Aug 18, 2008 1:37 am
- 15
- Location: Kenai, Alaska
Re: Welding aluminum
Gypseas, contraction in aluminum, well all welds for that matter, happen both across the weld's narrow axis referred to as the face, toe to top contraction and also along the length of the weld, axial contraction; both at the same time but not at the same rates.
One of the biggest problems newer aluminum welders have is making welds that are too big, or larger in cross section than really needed. That results in more heat to weld or 'burn the wire' into a molten puddle which in turn creates more heat in the parent metal being welded and that means more expansion so- yep you guessed it- when it cools more contraction and that means distortion. So the first step in distortion control is weld proportion and placement.
The key is to try to figure out a relationship between the size of the weld needed, and the speed of welding so the minimum amount of heat is added to accomplish any weld. This is where Brett's technique comes in. Instead of trying to weld long welds, plan to break them up into shorter welds, and the amount of contraction per individual weld can be reduced.
Tacking should always be done to 'story stick' marks. The four sides have the four common lengths and spacing/pitches for that size boat on its sides with the different patterns you'll use to weld- stitch or chain, and spacing (pitch) of the welds. Therefore, all tacks would be arranged to fit 'inside' the welds that will cover them and if the seam will be continuous like chines or keels then the tacks are even, close, uniform and ALWAYS dressed before welding. (not dressing tacks is not good building)
By using marker dots to show the tack locations of an extrusion that will be stitched to a hull surface the tacks, once dressed, will then be fused into the welds and the pattern of the tacks allows the weld prep and weld out to be organized on the tack pairs. It the seam will be continuous welded in a chain, they are back-stepped and spaced by the tacks to allow uniform welds that result in distortion control.
The tacks that Brett mentions are very important, since they sort of limit the edges of aluminum plate that are effect by a contraction. If a weld is made 10' from one end of the plat along a couple of edges not tacked- then- the entire edge of that sheet is pulled a tiny bit shorter and that results in a distortion of the edge. But.... it that same edge was tacked every 2-3 inches with single dime hot, short duration, tack then the weld at the far end is only pulling to the nearest tack, not the entire sheet edge.
This works to reduce the effects of edge or axial contraction. Also, if the welds are put in one near the end, but not AT the end, then one in the middle and finally one near the far end, but not AT the end, then the first pass as it's called is three welds of say 4" in three locations. Next pass would be to find the two welds evenly in between those three welds initially put in. None of the welds so far are touching, so there is no tie-in in this chain. The third pass would take up the very ends, and fill in between the other welds always dividing up the remaining un-welded areas evenly as possible. AT some time in this progress there will only be tie in welds. At this time the ends of ALL the welds are gouged with carbide tooling to make a round bottom, clean walled, pit to begin or end a tie-in chain weld.
The final pass will tie all the other welds into one continuous weld but all the contraction will have been limited first by the tacks then by the first pass and so on until the final pass ties in.
Some books and builders recommend different techniques of adding welds to the entire boat. I personally add inside outside balanced welds, not backed up to one another, and then I move fore and aft and side to side evenly to contract the entire boat in a uniform pattern. By slowly adding welds in planned sequences you can reduce area distortions to a minimum and result in a smooth sided boat, cabin or even fuel tank. My thinking is to take the decription above and apply it to all the hull seams keel, chines, sheer and do them all with the same type of description of chained welding but I add the pattern shown above regarding in & out; fore & aft; port & starboard and that seems to help me with hull panel distortion.
I think the key to 'thinking contraction' is to sketch the boat or welds involved and think of them as a draw string, pulling along the welds length wise AND to think of welds pulling across their face. This is (also) why its so importance to bevel for many welds in order to 'bury' the weld and reduce the contraction face inside the parent metal and reduce the effects of weld contraction. A beveled weld area, mechanically opening up a root face inside the parent metal will dramatically reduce the face contraction of most welds.
Welds in scale to the metal are critically important, welds applied with good travel speed and lots of amperage are also helpful in reducing contraction distortion and so are well placed tacks are part of the weld out plan.
Hope this helps, your practice controlling contraction, don't feel like this isn't a hard bit of skill for everyone to learn; all aluminum boat builders have made at least one wrinkle sided skiff, and as soon as they do they being like you and me to try to figure out how to control that aspect of our boats!
Cheers,
Kevin Morin
kmorin
-
Brettmpriest
- Posts: 3
- Joined: Tue Nov 22, 2011 4:55 pm
- 12
Re: Welding aluminum
That is the PHD level. Very well said Kevin. I've enjoyed reading your advice for quite some time!!
Brett
Brett
2014 Hand Crafted Fish-getter
Re: Welding aluminum
Kevin,
Thank You kindly for taking the time and help, once more I am humbled by your extensive knowledge of your craft and willingness to share.
Adrian
Thank You kindly for taking the time and help, once more I am humbled by your extensive knowledge of your craft and willingness to share.
Adrian
-
kmorin
- Donator 08, 09, 10, 11, 12, 13, 14, 15, 16, 17, 18, 19, 20, 21, 22, 23, 24
- Posts: 1743
- Joined: Mon Aug 18, 2008 1:37 am
- 15
- Location: Kenai, Alaska
Re: Welding aluminum
Gypseas, thanks for the kind words, it is Welder's intent that we gather as much welded aluminum boat knowledgebase here at the AAB.com Forum as we can. So, in keeping with that goal I'm glad to offer you a brief rundown on my list of countless mistakes, and there have been many. 
If you need to examine specific areas of work for contraction and distortion, please just post an image of the work area, or even the planned work area so I can try to illustrate some of the concepts, and assist your exploration of weld contraction.
cheers,
Kevin Morin
Kenai, AK
If you need to examine specific areas of work for contraction and distortion, please just post an image of the work area, or even the planned work area so I can try to illustrate some of the concepts, and assist your exploration of weld contraction.
cheers,
Kevin Morin
Kenai, AK
kmorin