
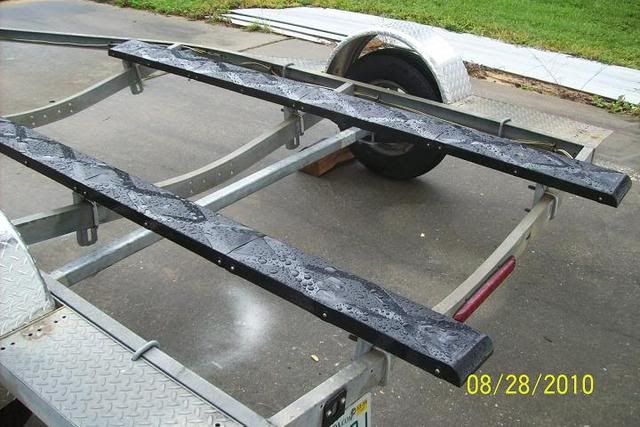
Decided to redo my trailer bunks after reading about the corrosion issues with carpet, pressure treated wood and water.
I removed the old bunks, the outer bunks are 3' 8" the center bunks are 10' 8". I replaced them with pressure treated 2X4s and new galvanized hardware. I filled the top bolt holes with silicone after tightening them down.
I ordered .5" Starboard pre cut to 3.5" width in 54" lengths, the longest you can ship without paying an oversize fee. I ordered it from Cesany plastics, http://www.yachtwindows.com/ I have ordered a lot of Starboard from them over the years, always good pricing and fast shipping.
I was not sure what type of screws to use, I looked around and found some 305 stainless deck screws, guaranteed not to corrode and any environment. I had to countersink the heads but you cannot buy a countersink bit with the right shank angle for deck screws so after I predrilled all the holes I used a drill bit the same size as the screw head diameter, I did a couple test holes and had a problem with the drill being pulled into the Starboard, I only wanted to go in a little more than .125" I used a scrap 2X4 and adjusted the drill bit in the drill so it only protruded the amount I wanted to drill, worked great. I used 10 screws in each smaller bunk and 30 in each larger bunk.
Cost was $90 for the Starboard, $30 for the 2X4s, screws and silicone and a couple hours time.
I will report back in a couple weeks when I have a chance to try it when I take the boat for the season.
Trailer bunk redo
Trailer bunk redo
- Attachments
-
- new bunks.JPG (134.75 KiB) Viewed 6725 times
-
- silcone.JPG (96.4 KiB) Viewed 6725 times
-
- screws.JPG (129.32 KiB) Viewed 6725 times
-
- Drill guide.JPG (100.64 KiB) Viewed 6725 times
-
- resessed.JPG (111.94 KiB) Viewed 6725 times
-
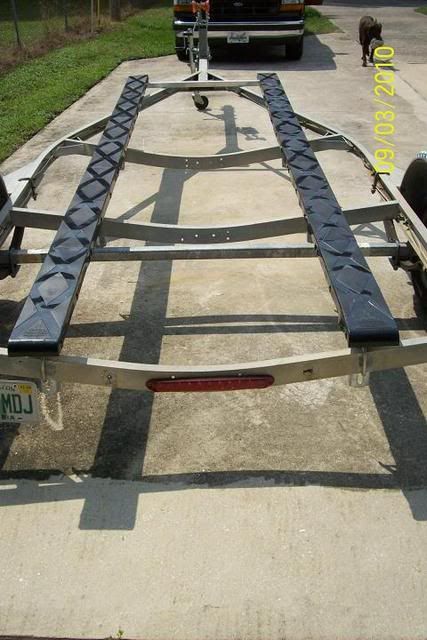
- All done.JPG (142.78 KiB) Viewed 6725 times
'05 Pacific 1925
Mercury 150
Mercury 150
-
Chaps
- Donator '09
- Posts: 2246
- Joined: Sun Jan 13, 2008 12:19 am
- 16
- Your location: Seattle, WA
- Location: Seattle, WA
Re: Trailer bunk redo
Good job. Just a heads up, I did the bottom on a boat early this summer that was showing evidence of corrosion in the areas of the countersunk screws on bunks like you just built. Problem was salt water trapped in the holes because of a tight fit of the bare hull on top of the bunks.
Issue was solved by cutting a shallow groove across each pair of countersunk holes with a router to allow the water to drain out.
Issue was solved by cutting a shallow groove across each pair of countersunk holes with a router to allow the water to drain out.
1987 24' LaConner pilothouse workboat, 225 Suzuki

please view and like: https://www.facebook.com/bottompainting/
please view and like: https://www.facebook.com/bottompainting/
Re: Trailer bunk redo
You could buy a plug cutter and sink the screws deeper and glue the plugs (made out of same material as the bunk surface) flush to the surface. No metal to metal connection. 

Re: Trailer bunk redo
Chaps wrote:Good job. Just a heads up, I did the bottom on a boat early this summer that was showing evidence of corrosion in the areas of the countersunk screws on bunks like you just built. Problem was salt water trapped in the holes because of a tight fit of the bare hull on top of the bunks.
Issue was solved by cutting a shallow groove across each pair of countersunk holes with a router to allow the water to drain out.
Thanks for the info, I will do that before I use it.
'05 Pacific 1925
Mercury 150
Mercury 150
-
AlloyToy
- Donator '08 '09 '10
- Posts: 2433
- Joined: Wed Jan 09, 2008 8:55 am
- 16
- Your location: Mass
- Location: MA & RI
Re: Trailer bunk redo
Well done
Re: Trailer bunk redo
Use these and you will not need to do that. Note the screws going into the sides. They make them for 2X4's and 2 X 6's.Issue was solved by cutting a shallow groove across each pair of countersunk holes with a router to allow the water to drain out.
A kit will do 2- 8ft boards.
"Just 'cause it's New, doesn't mean it's worth a Damn."
Re: Trailer bunk redo
warthog5 wrote:Use these and you will not need to do that. Note the screws going into the sides. They make them for 2X4's and 2 X 6's.Issue was solved by cutting a shallow groove across each pair of countersunk holes with a router to allow the water to drain out.
A kit will do 2- 8ft boards.
Too late now as always for me, but what are they and what do they cost?
'05 Pacific 1925
Mercury 150
Mercury 150
Re: Trailer bunk redo
I cut channels across each pair of screws down to the screw heads so they should not hold water, put the boat on the trailer, due to a strange ramp I had to winch the boat up most of the way, went up smooth and easy, seemed like it would come off very easy as well. So far so good.
'05 Pacific 1925
Mercury 150
Mercury 150
Re: Trailer bunk redo
Never take the winch strap off until boat is over the water. :)seemed like it would come off very easy as well.
"Just 'cause it's New, doesn't mean it's worth a Damn."