Rebuild, with Corrosion Spots

General boating discussion
Katoh
Posts: 191
Joined: Fri Feb 25, 2011 7:12 pm
13
Your location: A.C.T Australia.

Rebuild, with Corrosion Spots

#1

Post by Katoh »

G'Day Fellow Colleges
This is my first post on your forum, and I'm very pleased to be part of it now,I recognize a few names from other forums and there's some mighty fine people indeed.
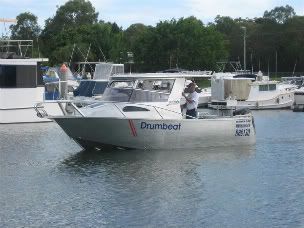
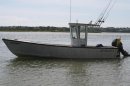
I shall start from the beginning, I was going to build from scratch a 7m plate boat for general recreation purposes, was to have an I/O diesel and be trail-able, I have all the plans ready and computer drawn code programed to be CNC machined. So basically ready to go, While searching for materials I came across a vessel nearly exactly what I intend to build but slightly smaller, The owner was desperate the rest is history.
B55.JPG
B55.JPG (41.99 KiB) Viewed 15140 times
So here we have a 6m custom plate boat built by Ken Fisher "fishermarine" S.A. Apparently from what little history I can find Ken built police and rescue boats only, really means nothing, he also had ties to Alufarm Boats still going today. The boat has a Volvo Penta AD31 130hp diesel in very good condition and a SP 290 leg. The hour meter reads only 236Hr but doesn't work but we think this is very close to the mark. A swim platform was added some time afterward with two transom pods welded under, increasing effective length to 6.5m.
B22.JPG
B22.JPG (29.18 KiB) Viewed 15140 times
The hull from the chine level up is in almost in pristine condition. From the chine down is a different story indeed. There are areas were the paint has bubbled and you can see the powder under, there are two holes through the hull both are 1/2' or 12mm dia and exactly opposite to each other at about mid-ship.
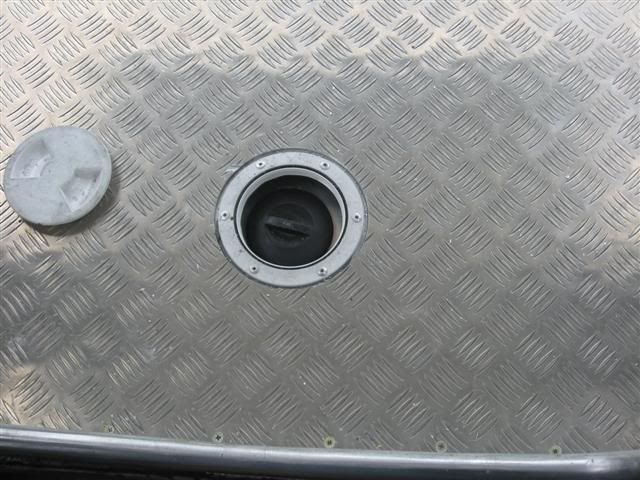
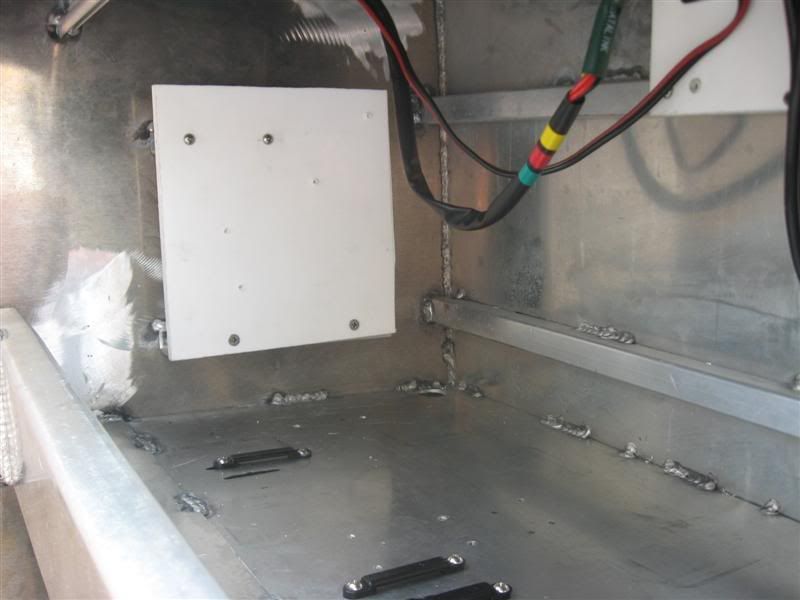
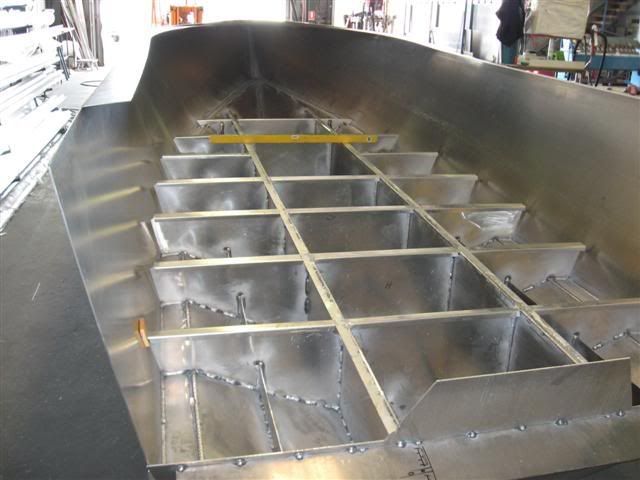
i am slowly stripping the boat back totally, so I can roll it onto its side and pressure wash the bottom to see the actual extent of the damage. The floor is fully welded with only a panel pop riveted and silicon ed to give access to the fuel tank. I have removed this panel to find the tank sits in its own fully sealed well, no access to the internal hull.
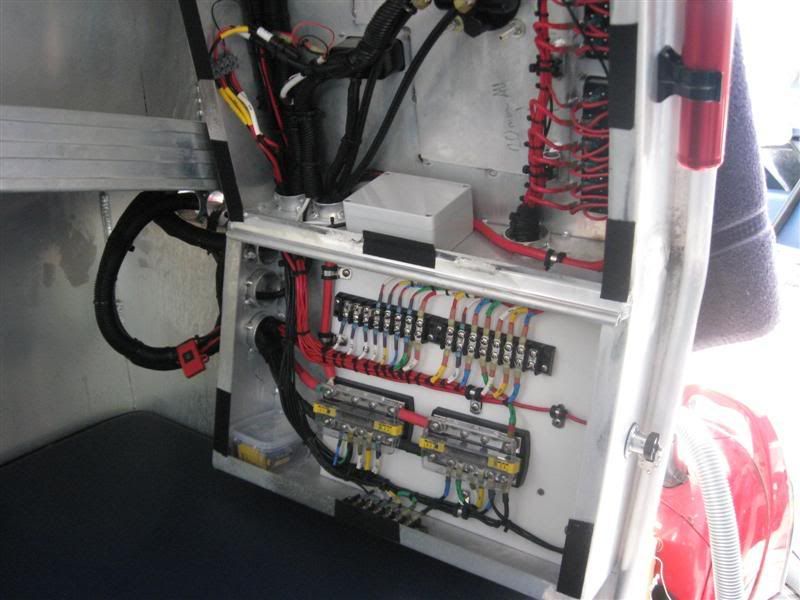
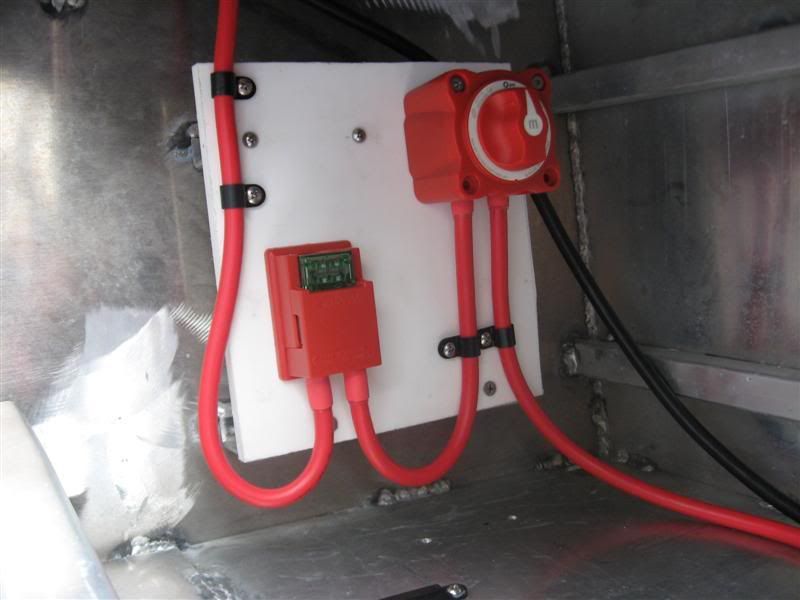
While removing parts I came across a few things that may have caused this problem, The previous owner installed some cabin lights, but only ran a positive cable to them, hull earthed the negative, lust like an automobile. One of the anodes on the leg were painted over, and there was no hull anode at all. Could there be any other things that might be wrong here? The boat sits on a multi roller trailer, which will be re hot dipped once I have the hull stripped and on its side. I was thinking could it be swarf or a screw a bolt from the manufacturer, maybe? In removing the pop rivets some fell through into the hull will this cause problems as well?
I have 280amp mig with a 250amp spool-gun dedicated for aluminum only, I was planning just to weld up the holes and were the powder pitting is, just clean it up and weld some material on top then grind down, or is there a better way? The other thing that concerns me is not being able to get into the hull could it be full of flotation foam, what will happen to it once I start welding? I don't really want to start cutting inspection holes all over the place either.
Katoh
Attachments
B11.JPG
B11.JPG (35.54 KiB) Viewed 15140 times
Cheers
Katoh
I maybe slow, but I'm bloody rough!
pjay9
Posts: 1137
Joined: Thu Mar 19, 2009 1:20 am
15
Your location: Tacoma, WA

Re: Rebuild, with Corrosion Spots

#2

Post by pjay9 »

I am no welder and there are many here that will advise to the best actions to take regarding the metal work. But in my thinking and for peace of mind you have to at least cut a few holes in the deck to inspect the hull inside. Rent a sewer snake cam that can be inserted and snaked into the recesses and see what is there. If foamed it may need to come out if it is wet therefore a deck removal will need to happen. Plus if you start welding then the foam will burn and/or melt depending on what it is and if that happened it can be TOXIC smoke, plus it may bun up other stuff that will further cause issues like fuel lines and wires...so pls be careful!
Post some more pics of the inside deck and details of your issues...it will help everyone to formulate advice.

Looks like a fun and useful boat...keep us posted as to your progress. Good Luck and have fun! Capt PJ
2009 Raider 185 Pro Fisherman, 2005 90Yamaha, 2012 Yamaha9.9HT, 2008 EzLoader roller, 2004 Dodge TCD dually, 2005/2015 Lance1161
peterbo3
Contributor
Posts: 486
Joined: Wed Jan 09, 2008 12:59 am
16
Your location: Brisbane, Australia
Location: Brisbane, Australia

Re: Rebuild, with Corrosion Spots

#3

Post by peterbo3 »

G'Day katoh,
Welcome to the site. :highfive: :highfive:
The fallen rivets.............if they are aluminium there will no electrolysis issues but they may jam your bilge pump. If they have a steel mandrel they will cause corrosion problems & will still jam your bilge pump .
The fuel cell & tank............. it may be easier to fit a fuel filler cap directly to the tank accessed by an inspection plate in the deck. Allows for quick refueling & combined with a graduated dipstick gives an accurate fuel level state.
Image
I would also remove the tank to check for tank & fuel cell corrosion. The tank needs to sit on non conductive strips (starboard or kingboard shown below, not rubber or wood) which allow some ventilation. Alloy to alloy contact in a damp environment promotes pinhole corrosion. Replace the fuel lines while you are at it. :thumbsup: :thumbsup:
Image
The underdeck foam................ you have to bite the bullet & see what is down there. The drain cam is a good idea. You can check the ribs, stringers, cross members, etc for cracked welds & the like. Seeing that the hull was used as an earth there may also be corrosion. Bilges damp with salt water plus stray current are the breeding ground of corrosion. There are plenty of watertight deck hatches available that will cover the inspection holes.
The hull holes................ do not weld them until the foam status is resolved. They may have been used for through hull fittings. Water pickups? Use them to measure the alloy thickness of the hull plates. Should be 4, 5 or even 6mm.
Paint............. is a bad thing on alloy boats. It WILL blister, chip, crack & require repainting every 5-6 years. Can you get the hull soda blasted from the gunnels down or at least from the chine? There are other alloy friendly blasting materials also.
The pods.................. port pod appears to have a hose running into it. Is it watertight? You may need to weld a pipe through the plate & fit the hose to both sides. My gut feeling is that the engine & leg made the boat arse heavy & that the pods were put on to increase buoyancy.
The wiring..................... you need to check every single wire including battery cables as some clown has used the hull as a ground. The correct way to wire the boat is by totally isolated (+) & (-) wires running to busbars from which all electrical components are powered. Exception is the engine start circuit & engine instruments. Tinned copper is the only way to go. Two big batteries (one start, one house) with a 4 way switch & a VSR would be my choice.
Image
Image
Anodes................. need to be replaced ASAP. You will most likely need a hull anode as well which should be attached to a welded alloy standoff.
Hope this helps.
Regards,

Pete in Brisbane
Image
User avatar
goatram
Donator 08, 09, 10, 11, 12, 13, 14, 15, 16, 17, 18, 19
Posts: 1959
Joined: Wed Apr 09, 2008 11:53 pm
16
Your location: Stanwood, Wa
Location: Stanwood WA

Re: Rebuild, with Corrosion Spots

#4

Post by goatram »

Pete that is still a neat and slick electrical wire job.

Katoh Some hatches installed for inspection are needed to find out what is below prior to repair. Migh find the old mans money downunder there. With the hatches you can even find more storage space as well.

It looks like you will have a nice winter (for you) project in time for your fishing season come Sept. or Oct. Keep us posted and the boat looks good from afar.
John Risser aka goatram
33' RBW with twin 250 Hondas (Aliens)
2015 Ford F350 Dually
Master of R&D aka Ripoff and Duplicate
Katoh
Posts: 191
Joined: Fri Feb 25, 2011 7:12 pm
13
Your location: A.C.T Australia.

Re: Rebuild, with Corrosion Spots

#5

Post by Katoh »

Definitely will be a good winter project. So far I am unable to remove the fuel tank due to Its full, I'm scrounging around for enough drums to fit 150 liters of diesel, once that's empty I can remove it, Have got my fingers crossed that there is some sort of inspection panel under the tank leading into the hull. At the moment I'm putting my money on there being no foam in the hull, I said the floor is fully welded every were, there's no Bilge pump in the hull, only one in the motor well, Those openings you see on the pods with the pipe running through, are drains for the floor scuppers. The bungs are inside the bods and new bungs have been added to the pods.
I think this was meant to be a totally sealed hull.
The original wiring from motor to controls is very well done, has twin battery's with isolation switch, its just the add-on pieces that have made a mess of things, and thank ***k there is not many of those. Once I get that tank out its going to tell me a lots, I am even thinking removing a large portion of the fuel well to add a bilge pump and even fill the hull with foam, don't worry about replacing piece as its sealed from the top platform anyway.
My Question is How can you fill the hull with foam and have a fully welded floor? It would have gone up in flames back then when they were putting it all together.
Another couple of pics might help.
I must say also its a very fine bit of wiring indeed , very impressive. You are welcome to give me a hand, anytime!
Attachments
Typical corrosion the line in the middle is the keel, I'm under the Boat.
BC1.JPG (74.81 KiB) Viewed 15086 times
One of The 3 corrosion spots in the hull, the hole is aprox 1/2" dia, the other two are exactly the same. These holes go through the hull.
BC2.JPG (24.21 KiB) Viewed 15086 times
The fuel tank in its own well, you can see the floor all round fully welded at every seem and intersection.
BFt1.JPG (105.42 KiB) Viewed 15086 times
Finally a pic of the motor in its own well, The only bilge pump on this boat sits just behind it. I owned a Marlin Broadbill before this boat , for those of you not familiar a plate aluminum twin hull boat. Non were ever fitted with pumps, just not needed according to the manufacturer. Maybe this boat is the same.
BM1.JPG (105.36 KiB) Viewed 15086 times
Cheers
Katoh
I maybe slow, but I'm bloody rough!
pjay9
Posts: 1137
Joined: Thu Mar 19, 2009 1:20 am
15
Your location: Tacoma, WA

Re: Rebuild, with Corrosion Spots

#6

Post by pjay9 »

I have just learned some interesting things form this posting. Nice wire job and sound advice given.

What is the brown peanut brittle stuff in the engine well? What is that stuff around the tank? Now that I see the cover to the tank...how is it held down? I say that as don't the screw holes give access to/breach the so called sealed area of the hull.

When it comes to foam there have been discussions on here about the issues and what to use and avoid. As pointed out, installing water tight hatches for possible storage space and to give access for inspection would be worthwhile in my estimation...just for the peace of mind that the hull was in good shape.

The rivets bring to mind the cleaning out of my brand new hull...yes my hull was new and when I pulled the forward deck to create storage space and to replace with Starboard instead of treated plywood covered with the crinkle vinyl I found loads of aluminum shavings and some ss screws and welding splatter as well as a cap from a pop bottle. I tipped the boat up high and ran water in each section by snaking the hose along which washed everything to the aft section where I vaced it out. I also got to see how the flotation was installed using the white bead board foam...don't like that but will live with it..until I can replace it...point being...IS there stuff in the hidden part of your hull that will cause further issue! I'd open it up!

It is a great project and with the welding skills you have...I am interested in seeing your progress. Capt PJ
2009 Raider 185 Pro Fisherman, 2005 90Yamaha, 2012 Yamaha9.9HT, 2008 EzLoader roller, 2004 Dodge TCD dually, 2005/2015 Lance1161
Katoh
Posts: 191
Joined: Fri Feb 25, 2011 7:12 pm
13
Your location: A.C.T Australia.

Re: Rebuild, with Corrosion Spots

#7

Post by Katoh »

Capt PJ
The brown stuff around the the tank and in the motor well is actually pour in foam. you buy it as a two pack, mix it up and pour it were you want it, It then foams up to make this brownish looking foam. The only reason I think its around the tank is to give it cushioning in the well. In the motor well it just seals the hole that fuel lines come from.
The rest of the motor well has the white box type foam glued to the sides and all over the cover, I think its just for sound deadening more than anything else.
The fuel tank is held on buy 3 stainless bolts on either side, you can see the bracket on the right hand side. When I removed the cover plate the tank was under water, again leading me to believe its a fully sealed unit. If there was access to the hull then the hull would have been full of water as well. You don't realize how large that tank is, its well opening is 4' by 2'.
I would really hope that there is nothing left in the hull from the builder, from what I have see of how the original boat was put together has been quite pleasing, you can see the duralac on the original bolts, there's not one spot of corrosion around them, only the things that were added after. An example the craziness, they mounted a fire extinguisher just under the hard top but sat it on the deck and used a mild steel bracket. Some people should not be allowed to touch boats. I really feel my problem is from all the add-on and earthing the hull, just hope its not going to be too bad, From the photos of the spots around the keel line, do you think its just more paint peeling than corrosion?
I have bought new zinc anodes for the motor and leg and a big one to go on the transom, As everyone says I really need to get into hull, Ill try and find a couple of 60l drums this week to empty the tank.
Katoh
Cheers
Katoh
I maybe slow, but I'm bloody rough!
pjay9
Posts: 1137
Joined: Thu Mar 19, 2009 1:20 am
15
Your location: Tacoma, WA

Re: Rebuild, with Corrosion Spots

#8

Post by pjay9 »

You are on site and making the calls. If that white foam around the engine is bead board I'd dump it and replace with some real sound deading materials...that shouldn't be that many $ to go around that engine...plus if it did burn it is toxic smoke.

It seems to me that what you say about the original build that sealing a tank fuel line and the tank in with 2 part expandable foam...that would not be in keeping with the rest of the build....there are far superior sealants and less mess doing it...just seems funny to me!

Waiting to hear about the tank removal and what you find! Capt PJ
2009 Raider 185 Pro Fisherman, 2005 90Yamaha, 2012 Yamaha9.9HT, 2008 EzLoader roller, 2004 Dodge TCD dually, 2005/2015 Lance1161
Katoh
Posts: 191
Joined: Fri Feb 25, 2011 7:12 pm
13
Your location: A.C.T Australia.

Re: Rebuild, with Corrosion Spots

#9

Post by Katoh »

Gentlemen
While searching for I'm not really sure what I was looking for, I came across a very interesting piece of literature, Follow the link, its an education, it did answer a question I was going to ask later. "To foam or not to foam" The tank is the Question? that's probably my once and only attempt at Shakespeare. Anyway according to this guy its a really bad idea to.
http://marinesurvey.com/yacht/fueltank.htm
Capt PJ
pjay9 wrote:It seems to me that what you say about the original build that sealing a tank fuel line and the tank in with 2 part expandable foam...that would not be in keeping with the rest of the build.
I should have mentioned the hull was made in 1992 that's nearly 20 years ago, bloody hell has it being that long! Maybe back then that's all they had? I cant answer that, it looked pretty neat to me till you mentioned it.
I picked up a 44 today and have got a line draining the tank, hopefully I will have that tank out soon. Its the not knowing whats under there that's getting to me at the moment, I'm probably making a big thing out of nothing.
Katoh
Cheers
Katoh
I maybe slow, but I'm bloody rough!
User avatar
welder
Site Admin
Posts: 4671
Joined: Thu Jan 03, 2008 11:51 pm
16
Location: Whitesboro, Texas
Contact:

Re: Rebuild, with Corrosion Spots

#10

Post by welder »

When the tank is put back in , do NOT foam it in and where the fuel lines go through the hull I would make a plate with bulkhead fittings to go through then bolt the plate in for later access.

Looks like a fun project . :thumbsup:
Lester,
PacificV2325, Honda BF225
2386
Katoh
Posts: 191
Joined: Fri Feb 25, 2011 7:12 pm
13
Your location: A.C.T Australia.

Re: Rebuild, with Corrosion Spots

#11

Post by Katoh »

Gentlemen
The tank is out, what a job that was. What we are left with is a totally sealed welded fuel tank well, with no access points at all. So in conclusion with have a totally sealed welded hull with no access points and I doubt very much there would be any sort of foam under the floor. The last statement is to be confirmed, but Ive got my money on it. Now the dilemma starts, do we go chopping holes left right and center, or do we remove the bottom of the fuel well and weld it back later, or do we again remove the bottom of the fuel well add a pump fill the hull with foam of some sort and leave the access there?
Must add the bloody fuel well is full of water, Surprisingly the tank looks in good condition except for one spot at the top of all places were the block foam was up-against it.
I cant understand for such a boat why you would seal the hull, any crack and your gone!
Katoh
There is one more option, and that's to leave the floor the way it is and just patch the holes from the outside and hope that's the extent of it.
Sorry one other option is under the passengers seat pedestal is to cut a hole there, don't know what good it would do but its a thought any way.
Cheers
Katoh
I maybe slow, but I'm bloody rough!
User avatar
aluminumdreamer
Donator '10
Posts: 369
Joined: Sat Apr 25, 2009 8:45 pm
15
Your location: Mid Coast Maine

Re: Rebuild, with Corrosion Spots

#12

Post by aluminumdreamer »

First off welcome aboard. I have been reading this thread having flashbacks of my own boat. I will be dealing with similar problems as yours as soon as the weather clears here on sunny Cape Cod. My hull was also mistreated by an incompetent owner and had a nightmare of a wiring job and a brass through hull transducer. I will be doing a lot of cutting and welding.

Another problem I have encountered is the fully sealed hull. I want to know what is inside my hull. I plan on cutting an access hole in the deck in front of my pilothouse. I would like to make the hole large enough that I can fit through it as to gain access with a flash light to inspect for any damage.

I hope to be at work on my boat next month (weather permitting) :banghead: I'll be posting pictures as I start to make progress. Keep the updates coming on your hull. Good luck.

Nate
Katoh
Posts: 191
Joined: Fri Feb 25, 2011 7:12 pm
13
Your location: A.C.T Australia.

Re: Rebuild, with Corrosion Spots

#13

Post by Katoh »

aluminumdreamer I feel your pain!
When you actually look at what I have to deal with, I would have to cut 8 holes in the floor or 7 in the floor and one in the fuel well to gain full access to all the inner hull. I would like to know does corrosion start from inside and work out or from outside and work in? This could play a major influence on what happens next. I like the idea of fitting a pump and having foam, the pump bit is too easy the foam bit is not.
aluminumdreamer, do you really need to get into your hull or can your repairs be done externally?
My next job now is to remove the motor and leg, not that is easy either, as the motor weighs 450kg (1000lb), once there out the hull is basically stripped, by that time with all the good advice I should know what I am going to do next.
I built a CNC router from scratch a monster of a machine, fixing a leaking bathtub should be a walk in the park, but its nice to ask directions because we tend to get lost.
Katoh
Cheers
Katoh
I maybe slow, but I'm bloody rough!
peterbo3
Contributor
Posts: 486
Joined: Wed Jan 09, 2008 12:59 am
16
Your location: Brisbane, Australia
Location: Brisbane, Australia

Re: Rebuild, with Corrosion Spots

#14

Post by peterbo3 »

Katoh,
You have to get into the hull. You already have two holes in the bottom plates that MUST be repaired. Enlarge them to 200x150 (8"X6") or bigger & get the drain cam/lights/mirror in. Does not matter if you cut stringers or ribs as they can be welded back in prior to replating the holes. Or you could weld in internal backing plates for extra strength then butt weld patches into the hull bottom.
Having said that, the hull MAY be divided into water tight compartments, either across or length ways. My boat has two outer compartments & a centre line compartment plus a forward collision bulkhead.
Image
This is not my boat. It is of similar construction but does not have the ballast tubes. The three compartments are evident. Each compartment has a transom drain plug.
Plenty of ready made alloy deck hatches around that are big enough to get through..........unless you are a little fat sucker like me. They are not cheap but you said you got a good deal on the boat...................... :thumbsup: :thumbsup:
Regards,

Pete in Brisbane
Image
Katoh
Posts: 191
Joined: Fri Feb 25, 2011 7:12 pm
13
Your location: A.C.T Australia.

Re: Rebuild, with Corrosion Spots

#15

Post by Katoh »

G'Day peterbo3
From what you show me that could very well be what we have, I'm more inclined at the moment to cut the the bottom out of the fuel well, the hull corrosion all 3 spots are in that area. The other things I don't like is that firstly the fuel well is full of water, nowhere for it go, secondly the bungs cannot drain the hull as the motor well is in the way, totally sealed, were or how would water in the hull be able to escape from, it couldn't, the lowest point being the keel is sealed of by the motor well. It needs a pump, maybe 2, the big question is still flotation, what do we do there? No shots but I'm not the smallest most agile person, 5'11" and 100kg I don't think I'm going to be fitting in any tight hulls soon.
Almost got the leg off today but those pods wont let me remove the hinge pins, more dramas, hopefully I will get the motor out in the next week or so and then start cutting and patching, At the moment the more I strip the worse it gets.
Come to think of it would be darn good if the hull was built like what you show on the photo, the mid section would be one large chamber and makes sense its all concentrated in that one section, meaning the other sections should be dry and untouched, got my fingers crossed.
Many Thanks for all the replies
Katoh
Cheers
Katoh
I maybe slow, but I'm bloody rough!
Katoh
Posts: 191
Joined: Fri Feb 25, 2011 7:12 pm
13
Your location: A.C.T Australia.

Re: Rebuild, with Corrosion Spots

#16

Post by Katoh »

Gentlemen
I have just had the chance to make 3x 100mm 4" holes in the bottom of the fuel well. One hole is directly above the largest corrosion hole.
So what i found "drum roll maestro please" Absolutely Nothing, YES Nothing. The internals look like they have just been built today, you can see all the original pen marks from the builder. OK I hopped back under the boat to inspect the other two corrosion holes, the second looks like the first but smaller the third being in a more difficult position is not a hole yet! but a crevice only half way through, from outside to in. No need to go making more holes in the floor. What I did find is a lot of free water in the hull, vacuumed that out, and around the largest hole was what appeared to be a waxy slime.
There is still no indication of foam?
Along the keel line there are open channels so water in the hull can drain to the stern but the motor well is in the way, I think there is two holes at the base to let the water run back, these could be blocked. I wont know until I get the motor out, just waiting on a crane, a friend will swing past in a week or so with one.
The leg has been removed to find a split U-Joint bellows an a lot of corrosion on the below ties and rust, but otherwise not to bad at all, for the age.
Should I block the holes off or leave them in the fuel well, remember it was full of water when I removed the tank.
Cheers for now
Katoh
Cheers
Katoh
I maybe slow, but I'm bloody rough!
User avatar
goatram
Donator 08, 09, 10, 11, 12, 13, 14, 15, 16, 17, 18, 19
Posts: 1959
Joined: Wed Apr 09, 2008 11:53 pm
16
Your location: Stanwood, Wa
Location: Stanwood WA

Re: Rebuild, with Corrosion Spots

#17

Post by goatram »

Add a drain tube in the Back corner? Leading to the bilge pump. something you can see and pull a plug if there is water to be drained.
Block the new holes so in case your tank springs a leak it is not going to foul the Bilge.

Your Drain holes through your motor well could be blocked as you say. Can't get a mirror in position to see? Is there space below it or is the bottom plate the Hull?

The insides are clean as can be? Bright and shinny around the corrosion Holes?

O ya need some more pictures
John Risser aka goatram
33' RBW with twin 250 Hondas (Aliens)
2015 Ford F350 Dually
Master of R&D aka Ripoff and Duplicate
Katoh
Posts: 191
Joined: Fri Feb 25, 2011 7:12 pm
13
Your location: A.C.T Australia.

Re: Rebuild, with Corrosion Spots

#18

Post by Katoh »

Gentlemen
I have taken a couple of quick photos that will explain a lot.
BH3.JPG
BH3.JPG (34.18 KiB) Viewed 13171 times
This is the first hole you can see the keel bar, and the two bottom plates, you can also see a pen line from the builder in black.
BH1.JPG
BH1.JPG (35.14 KiB) Viewed 13171 times
This is the 3rd hole above the corrosion hole, the discoloration is dirt sitting on top of the plate. If you run your hand over the plate it is smooth not rough at all there is no pitting or sign of corrosion, just dirt.
The second hole is adjacent to the 3rd it shows basically a stringer and is no different from the first photo, shows just a clean hull.
Goatram if you look at the photo on post No.5 photo of the motor in the well, at the front of the well were all that spray crap is right down the bottom I think there is two weep holes, I will have the motor out soon and that will give me some good access to them. I don't understand what you mean about the tap in the fuel well, I can understand why you would keep it sealed but the darn thing will just fill with water again after a while, It really needs to have a pump of its own.
I believe I know now how the hull is built. it is divided into 3 sections that run parallel to the keel line, and are at the same width as the motor well, each section is fully enclosed welded shut. There are two drains on the transom one for each side section and the middle keel section is meant to drain into the motor well, where there is a bilge pump.
Now were getting somewhere. I think?
Katoh
Cheers
Katoh
I maybe slow, but I'm bloody rough!
User avatar
goatram
Donator 08, 09, 10, 11, 12, 13, 14, 15, 16, 17, 18, 19
Posts: 1959
Joined: Wed Apr 09, 2008 11:53 pm
16
Your location: Stanwood, Wa
Location: Stanwood WA

Re: Rebuild, with Corrosion Spots

#19

Post by goatram »

The Tap or Drain Hole plump to the Bilge that you can plug and drain when Needed after you are sure that no fuel is mixed in with the water and no chance of an explosion or fire when it gets back to the bilge pump.

As to the hole in the bottom. In America we have Copper Pennies and they are round and will leave a hole like that I have been told. Do you all have Copper Coins Down Under? If so was the Original Owner a tough old bird/ Someone could have left him a few coins for his enjoyment. Now its yours. If you have access above each hole? Clean the holes to remove the corrosion cut scab patches for the inside and fill the holes with plugs and weld the plugs first then the scab patches then reseal the access holes. Add in the drain to the bilge while your in there
John Risser aka goatram
33' RBW with twin 250 Hondas (Aliens)
2015 Ford F350 Dually
Master of R&D aka Ripoff and Duplicate
Katoh
Posts: 191
Joined: Fri Feb 25, 2011 7:12 pm
13
Your location: A.C.T Australia.

Re: Rebuild, with Corrosion Spots

#20

Post by Katoh »

Goatram
Yep I can see what you mean now, easy enough done. A bit of 3/4" aluminum pipe from the bottom side of the well straight back to the engine well, no problem, easy job. I only have made an access hole over one of the corrosion holes, the other is further forward and I would have to cut the floor out, The 3rd spot which is not a hole yet just a pit is across from that one, now I know there's nothing there I wont go making extra work by cutting more floor Ill plug and weld those two from the outside. Copper coins were stamped out in the late 80's here, plus doesn't make sense if a coin or something was left there it would have rolled into the lowest point around the keel bar not stayed 150mm or 6" up the side of the "V".
My theory, the previous owner wired the hull active (Fact) The weep holes for the mid section keel line became blocked (fact)
A week point must have been found in the material and blow the first hole, with the hole there, water would always be at that level causing the creation of the second and nearly a 3rd hole, this is assumed because all 3 holes are approximately 150mm up from the keel line. Could this be true or simply the ramblings of a madman.
Katoh
Cheers
Katoh
I maybe slow, but I'm bloody rough!
Katoh
Posts: 191
Joined: Fri Feb 25, 2011 7:12 pm
13
Your location: A.C.T Australia.

Re: Rebuild, with Corrosion Spots

#21

Post by Katoh »

DMJY I am quite lucky there's no foam on the boat, well not in the hull, The tank was foamed in but all of that has been removed. Talking about the tank, while waiting for the crane I started cleaning the tank up, in most places were that foam had stuck to the tank there are patches of crevice corrosion, and I found a small leak in the bottom weld. The inside actually looks in good condition, just need to spend a bit of time and fill those holes in. After I get it back in shape I will pour some of that Urethane tank liner finish in to coat the inside as well.
Yes I do know the risks in welding up fuel tanks, if it was a petrol (gasoline) tank it would be heading to the scrapheap or to someone else to repair, but being diesel a good wash out and soak, then a quick flame test prior to welding is ample. The other thing its an open tank all fittings off and out of the boat. A word of caution to others I have heard and read you can purge a tank by pumping exhaust gas from a motor vehicle into the tank. DO NOT DO THIS there is an amount of unburnt fuel in your exhaust when you pump it into a confined space you may end up with a bomb.
Katoh
Cheers
Katoh
I maybe slow, but I'm bloody rough!
User avatar
goatram
Donator 08, 09, 10, 11, 12, 13, 14, 15, 16, 17, 18, 19
Posts: 1959
Joined: Wed Apr 09, 2008 11:53 pm
16
Your location: Stanwood, Wa
Location: Stanwood WA

Re: Rebuild, with Corrosion Spots

#22

Post by goatram »

Fuel tank flooded with Nitrogen is a whole lot better than Exhaust. Been there done it. The bucket list is scratched
John Risser aka goatram
33' RBW with twin 250 Hondas (Aliens)
2015 Ford F350 Dually
Master of R&D aka Ripoff and Duplicate
Katoh
Posts: 191
Joined: Fri Feb 25, 2011 7:12 pm
13
Your location: A.C.T Australia.

Re: Rebuild, with Corrosion Spots

#23

Post by Katoh »

Evening all
The saga continues, I have finally striped the boat totally, and today with the help of 8 able bodies we rolled the hull off the trailer onto a bench were now she sits on her side. A video was taken of the operation in action , If I get sent a copy I will post it on You-Tube. Other than that here is a couple of snaps of the task that was.
rolled1.JPG
rolled1.JPG (44.84 KiB) Viewed 13058 times
rolled2.JPG
rolled2.JPG (41.52 KiB) Viewed 13058 times
I have almost finished repairing the fuel tank, I have gone through ever spot of corrosion dug it out and filled it up with weld.
My next task is to totally dismantle the trailer, have all the pieces re-Hot dipped galvanized, then replace wheel bearings and fix the braking system. once trailer is rebuilt, weld the little holes in the bottom plate, and Re-Spay the bottom in 2-pack (pipeline Grey color) After that I can put her back upright.
Katoh
Cheers
Katoh
I maybe slow, but I'm bloody rough!
User avatar
welder
Site Admin
Posts: 4671
Joined: Thu Jan 03, 2008 11:51 pm
16
Location: Whitesboro, Texas
Contact:

Re: Rebuild, with Corrosion Spots

#24

Post by welder »

This is a Excellent thread :thumbsup: Are you going to pressure test your fuel tank ? It only takes about Three [3] P.S.I.
Lester,
PacificV2325, Honda BF225
2386
kmorin
Donator 08, 09, 10, 11, 12, 13, 14, 15, 16, 17, 18, 19, 20, 21, 22, 23, 24
Posts: 1752
Joined: Mon Aug 18, 2008 1:37 am
15
Your location: Kenai, AK
Location: Kenai, Alaska

Re: Rebuild, with Corrosion Spots

#25

Post by kmorin »

Katoh,
After read your posts about the rebuild of your hull I wanted to clarify a point or two? You mentioned in one post:
Katoh wrote:So what i found "drum roll maestro please" Absolutely Nothing, YES Nothing. The internals look like they have just been built today, you can see all the original pen marks from the builder.
but the pictures posted of the internal plate of the hull didn't seem to fit the description.

I think the images shown show a highly corroded surface. The pitting starts seem pretty uniform and the reason is the mill scale doesn't appear to have been removed in the original build? I'm not sure from the pictures since there is some bilge discoloration but the mill scale seems intact as indicated by the marker line being present on material that seems to have retained mill scale?

All the white chalky areas with the darker center points seem like small galvanic cells in the photos you posted and I'd estimate the entire bottom/bilge area is similarly involved?

If the boat were mine I'd make all my efforts to acid wash the inner bottom then rinse then check the ph of the bilges and keep them neutral using some base like baking soda or house hold ammonia in a dilute solution.

If the surfaces you show are not cleaned, acid cleaned, and then neutralized it has been my experience these conditions mean a boat's demise is just a matter of time.

In the 1970's and 80's I did welding maintenance on a various boats in a small commercial salmon fishing fleet (couple dozen rebuilds, hull repairs, and countless modifications) located in the Cook Inlet in Alaska, USA and during that period I built a few boats myself. I would say the inner hull panels you show represent a highly corroded aluminum surface and not a seaworthy welded aluminum boat's inner bottom.

I recently looked at the bilge of a one year old, very highly name brand (NWest US) welded 26'er with nicely colored yellow topsides and the it was not acid washed in the bilge and that boat has pitting in less than one year from the builder's shop.

The problem of not removing mill scale is not rare, and can be corrected with a little effort almost anytime up to the time when the pitting is so wide spread there is no value in the boat.

I do hope my screen-image-informed-view of the plate is not right? but.... if you clean the hull below the deck openings and wipe it fully to bare metal (not in a single cursory cleaning; but using acetone and three or four cleaner rags to obtain absolutely clean metal) and there are (still) slight rough patches with a residual white chalk which is slimy when wet, then, my experience indicates you will need to address the mill scale if you expect to recover the boat.

cheers,
Kevin Morin
Kenai, AK
kmorin
Post Reply Previous topicNext topic