new project - advice requested...

Mods and custom builds
Merlin
Posts: 146
Joined: Sun Feb 10, 2008 6:50 pm
16
Location: southern baja

new project - advice requested...

#1

Post by Merlin »

Hi all,

It's been a while. I've been lurking and soaking up info but haven't posted in a bit. I've had several projects to get behind me and now I have a good one on the boat - time for a new floor. I'll post a full report when it's done but right now I need a little advice. I pulled the old plywood floor out - rotten piece of...

Image

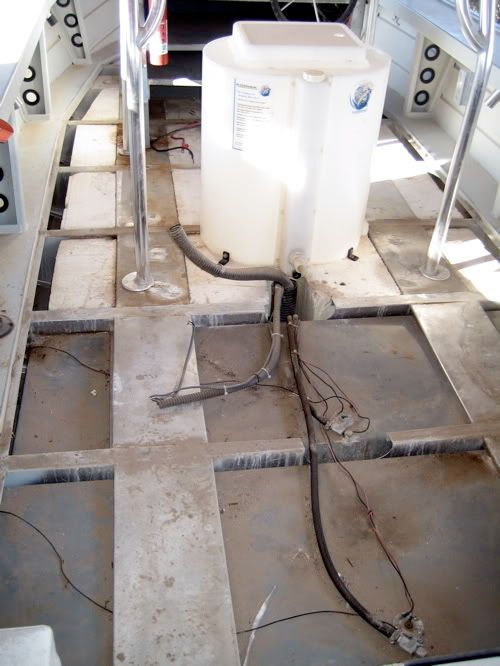
Anyway, as you can see in the first photo there are some 12" wide floor plates welded between the bulk heads. I'm not sure how much structural help they give but there they are. The center console and T-top were lag bolted to the plywood and through these plates. It seems the flexing of the T-top poped the welds on the floor plate it was lagged to.

Image

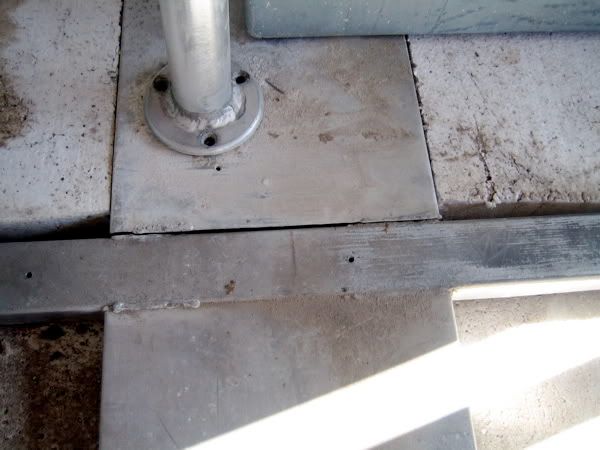
Here is where I need some advice. How would you fix it? Simply re-weld? Add some aluminum angle iron below and weld? or epoxy? Is there any cause for concern throwing a welder on the older aluminum or any advice on how to weld it?

When I got the boat the T-top only had four legs - I added the back two eliminating the flex the T-top used to have so it shouldn't exhibit the same force in this area again.

Next question; how would you attatch the T-top and the console to the new floor? Lag again? T-nuts?

Many thanks in advance for any advice!
Chaps
Donator '09
Posts: 2246
Joined: Sun Jan 13, 2008 12:19 am
16
Your location: Seattle, WA
Location: Seattle, WA

#2

Post by Chaps »

Those welds can be rerun no problem, get the material at the joins bright, shiny clean, removing all old oxidation is a must. On the fastening system I would put SS cap screws (hex bolts) up thru the alum deck plates from the bottom side and secure them with jam nuts. Then drop the new plywood flooring over that by predrilling holes in the wood that will allow the bolts to poke thru. Secure T-top with SS acorn nuts or regular nyloc nuts. On the plywood you'll have to counterbore the underside of the panel at the holes slightly to allow clearance for the jam nuts holding the bolts in place.
1987 24' LaConner pilothouse workboat, 225 Suzuki
Image
please view and like: https://www.facebook.com/bottompainting/
Merlin
Posts: 146
Joined: Sun Feb 10, 2008 6:50 pm
16
Location: southern baja

#3

Post by Merlin »

Ok, I follow you. Welding seems easy enough. And, for this floor panel getting some bolts locked in is easy - I can do it before I weld it back down. But on the others there is solid foam under that I would need to carve out, and quite a bit of it in order to get a bolt along with wrench to secure it. These floor panels have quite a bit of flex and the solid foam adds support that I don't want to sacrifice.

I don't think the lag bolts are the right solution but otherwise I'm in for some more invasive surgery. Any other thoughts?
User avatar
JETTYWOLF
Contributor/donator/Location Nazi
Posts: 6074
Joined: Sun Jan 06, 2008 9:11 pm
16
Your location: JACKSONVILLE FL USA
Location: Tree-hugger, USA...they call it FLA.

#4

Post by JETTYWOLF »

I'd go nutz with a welder, and his skills. Maybe even have that floor in Aluminum istead of rot wood, and still have it pull-able.

Twin fuel tanks...?? Quite large.
Merlin
Posts: 146
Joined: Sun Feb 10, 2008 6:50 pm
16
Location: southern baja

#5

Post by Merlin »

If there was a good aluminum guy here I would consider aluminum. Rest assured, wood is not going back in. We laid up some solid NON ALLOY floor panels - I think they are going to be killer. Photos coming soon.

Yes, two tanks. 60 gallons each. With the economy this rig provides I can fish forever on a full tank and gasoline is only $2.20 a gallon here! Our season kicks off in about a month with white seabass and yellowtail first on the agenda. Can't wait.
User avatar
JETTYWOLF
Contributor/donator/Location Nazi
Posts: 6074
Joined: Sun Jan 06, 2008 9:11 pm
16
Your location: JACKSONVILLE FL USA
Location: Tree-hugger, USA...they call it FLA.

#6

Post by JETTYWOLF »

Just went up .10 cents or more in 6 days here in my "berg"
Pretty soon the only fishing I'll be doing is when I run into a rich man who wants to go.

I figured they looked at least that...man that's alot of fuel @ $2.20 a gallon.

My boats never had more than a 1/2 tank in the 150 gal single since I bought it 16 months ago...and that maybe turn into never more than a 1/4 tank real soon.
IN2DEEP
WON Super Star Donator '08, '09, '10, '11
Posts: 638
Joined: Sat Mar 15, 2008 1:07 pm
16
Location: So. Calif.

#7

Post by IN2DEEP »

Merlin,
If you have access to some aluminum 2X2 angle in 3/16 to 1/4" thick, you can through bolt it to the stringer face and the bottom of the floor plates. Use screws with low profile heads and nylon lock nuts so they don't stick up too high. IMO, this may hold up better to the constant flexing in that area. If your at it, you can also throw some weld on there also.

As for the T-top bolt down area, I've had good luck adding an aluminum plate (1/4" thick) to the underside of floor plates such as yours to thicken up that area and drill and tap so you can use SS machine bolts to bolt it down.
You can use SS pop rivets to hold the plate to the bottom side. You just need to hold it in place so you can get the tapped holes in it, then once the top is in place, it will pinch everything together.

BTW, is that a Bayrunner you have there?
From your pictures, it looks like it may be.

Scott
Image
1989 22' Walkaround Cuddy Bayrunner
2001 115 Merc. 4 stroke/1988 9.9 Yamaha 4 stroke kicker
Tin Man
Posts: 12
Joined: Fri Jan 11, 2008 9:01 am
16
Location: San Diego, CA

#8

Post by Tin Man »

Your project boat looks a lot like my old Bayrunner Baja 21 (as also noted by Scott). I recently had a welder (Jim Day) make similar repairs on the boat plus he also has a Bayrunner. You can reach him on Allcoast or by e-mail at skiffybusiness@hotmail.com.

Mark
IN2DEEP
WON Super Star Donator '08, '09, '10, '11
Posts: 638
Joined: Sat Mar 15, 2008 1:07 pm
16
Location: So. Calif.

#9

Post by IN2DEEP »

Oh yea, Jim Day posts on allcoast often.
Looks like Merlin may be a little too far away in Southern Baja.
If it's a Bayrunner, I'm guessing either a 23 or one of those 26 footers that they made at one time.

Scott
Image
1989 22' Walkaround Cuddy Bayrunner
2001 115 Merc. 4 stroke/1988 9.9 Yamaha 4 stroke kicker
Chaps
Donator '09
Posts: 2246
Joined: Sun Jan 13, 2008 12:19 am
16
Your location: Seattle, WA
Location: Seattle, WA

#10

Post by Chaps »

Merlin wrote:Ok, I follow you. Welding seems easy enough. And, for this floor panel getting some bolts locked in is easy - I can do it before I weld it back down. But on the others there is solid foam under that I would need to carve out, and quite a bit of it in order to get a bolt along with wrench to secure it. These floor panels have quite a bit of flex and the solid foam adds support that I don't want to sacrifice.

I don't think the lag bolts are the right solution but otherwise I'm in for some more invasive surgery. Any other thoughts?
I would just do the cap screws for the t-top mounts, not the whole deck. As far as getting the bolts in without tearing out a bunch of foam cut the welds at one end, bend the plates up enough to install the bolts then bend them back down & reweld. If you are going to be in there welding anyway whats a couple more inches of mig wire?
1987 24' LaConner pilothouse workboat, 225 Suzuki
Image
please view and like: https://www.facebook.com/bottompainting/
Merlin
Posts: 146
Joined: Sun Feb 10, 2008 6:50 pm
16
Location: southern baja

#11

Post by Merlin »

Yes, it's a 1999 Bayrunner 23' with a 130 Honda on the transom. The hull is in great shape but the floor finally went. I've owned her for about a year.

Great suggestions, thanks everyone. I like the idea of making some aluminum plates to slide under the existing floor plates. I believe there is enough flex and room to squeeze them in. I can use some jb weld to hold them in place instead of rivets. If I have a hard time getting them in place I can always cut the welds on the other floor plates and re-weld, like Chaps said - what's a couple more. If I can get a mig welder, that is. The plates should help to distribute the load a lot better as well.

Thanks!
IN2DEEP
WON Super Star Donator '08, '09, '10, '11
Posts: 638
Joined: Sat Mar 15, 2008 1:07 pm
16
Location: So. Calif.

#12

Post by IN2DEEP »

Merlin,
I'm guessing that the styrofoam block is one piece and was in place prior to the floor plates being welded on top of them.
You can probably get them out of there if you turn them into 3 pieces by slicing the middle section out then sliding the two sides towards the center. Reinstall them in reverse order.
I don't how you feel about cutting your foam, but I don't believe that it will affect it's ability to keep the boat floating.

In my experience with using JB Weld as a glue, it has a limited ability to get good long lasting adhesion to aluminum.
Have you ever used any of the GOOP products?
I've found this stuff to have tremendous abilities to adhere to clean, roughened up aluminum.

Good luck with the repair, Scott
Last edited by IN2DEEP on Sat Apr 19, 2008 10:36 pm, edited 1 time in total.
Image
1989 22' Walkaround Cuddy Bayrunner
2001 115 Merc. 4 stroke/1988 9.9 Yamaha 4 stroke kicker
User avatar
welder
Site Admin
Posts: 4668
Joined: Thu Jan 03, 2008 11:51 pm
16
Location: Whitesboro, Texas
Contact:

#13

Post by welder »

PM or E-mail, Bullshipper .

Just go to the Members List up top and find his name , He knows people all over Mexico [ Welders and Fabricators ]

I would not Glue anything under the deck , The lighter Hulls Flex and a glued connection will not hold very long .

I suggest thru bolt or weld and hurry up cuz there are FISH out there that NEED to be caught. :D
Lester,
PacificV2325, Honda BF225
2386
Ironwood Boats
Posts: 31
Joined: Fri Apr 18, 2008 11:21 am
16
Location: Vancouver BC
Contact:

Deck Fix

#14

Post by Ironwood Boats »

Hi

Safety first so I thought it better to say something than not ..... If you are welding on a boat that has gas in it either remove the gas tanks or seal and pressure test the fuel tanks for leaks. If there has been a gas leak check the hull to make sure there are no sealed/watertight compartments gasoline has leaked into.

If this job came into our shop I would want to know 6 things
1.) How long did it take to crack/how old is the boat.
2.) How long do you want the repair to last
3.) Where is the boat used
4.) How many hours is the boat used a year
5.) Thickness of the aluminum that has broken
6.) How much money do you want to spend on the repair.


For a quick long term fix with no welding
Lay a 1/2"- 3/4" thick flat bar along the the deck. Counter sink and through bolt the new flatbar into the old structure. Then cut the deck panels to fit around the new flat bars. Use urethane caulking to seal the deck panels to the flat bars. Use 3M Grip tape to cover the bars. Mark the required holes for the T Top and drill and tap into the new flatbar. If the flat bars go over the fuel tank scribe the position of the fuel tank on the top of new flat bars for future reference.
The new bars also give you places to easily mount things to later if needed. If you use wide enough flat bars it is possible to fix the seating and the console this way as well.

If you let me know about the 6 question I will give you more ideas.

Sincerely
John
Ironwood Boats
mojomizer
Contributor/Donator '08
Posts: 1205
Joined: Sat Jan 12, 2008 4:38 pm
16
Location: Orange County

#15

Post by mojomizer »

Merlin, Everyone has given you sound advice. Not much I can add........ but thinking a little out of the box (disclaimer has gotten me in trouble with wife on home projects.) "ok so I removed the washer and dryer and sink so I could park the 19' Valco in the garage"........ Have you given any thought of moving the center console and T-top back the three or so inches so the footing rests on the cross beam. That would eliminate the flex cracking in the future. Shifting the center of balace would be my only major concern.

Mark
2325 wa Pacificskiff
19' Valco Bayrunner

Ya ya ya I'm baaaaack!!!!!!!!
Mark
2325 WA PACIFICSKIFF
Merlin
Posts: 146
Joined: Sun Feb 10, 2008 6:50 pm
16
Location: southern baja

#16

Post by Merlin »

Thanks everyone for all the great advice. I had to run to town for a couple of days to get some immigration work done. I also picked up the new floor panels - they turned out great!

mojomizer - I thought about moving the console and T-top (it actually has to go forward) and may still do it. I like the idea of bolting at least one set of legs to the bulk head.

John (Ironwood) - thanks for the safety back up, of course we'll take every precaution. Here are some answers for you:

1.) How long did it take to crack/how old is the boat.

The boat is a 1999. How long has it been cracked is anyone's guess.

2.) How long do you want the repair to last

I want it repaired right so it lasts forever (or as long as I own it, anyway!)

3.) Where is the boat used

I'm in southern baja and use the boat in the pacific.

4.) How many hours is the boat used a year

I've only owned the boat for a year and I put a little over 200 hours on her.

5.) Thickness of the aluminum that has broken

The aluminum is .080". Just to be clear, the aluminum didn't break the weld popped.

6.) How much money do you want to spend on the repair.

This is a hard one to answer. The first thing that comes to mind is whatever it takes to do it right. But, where I live it's not always about cost but about what's available.

Lastly, I like the idea of bolting or welding some flat stock across the bulk heads to bolt into. I'm going to give that a lot more thought.

Thanks again to everyone!
Ironwood Boats
Posts: 31
Joined: Fri Apr 18, 2008 11:21 am
16
Location: Vancouver BC
Contact:

Deck Repir

#17

Post by Ironwood Boats »

Hi


I forgot... Question # 7.) How fast does the boat go.

I would question you on spending too much $$ on a boat built with .080 that is used on the ocean.

Aluminum stress hardens as do many materials. To make these materials last it is necessary to keep the stress/stretch down to a point that it does not have an affect on the material. It is very difficult to do this with .080.

A little about aluminum welding strength.
The weld failed because it is a one sided weld on a plate that is flexing. If it was welded on the bottom also it may have taken longer to crack but the weld would not have failed. The crack would be beside the weld rather than though the weld. This is because aluminum looses its strength when welded. This area beside the weld is called the heat affected zone and for engineering is an area 1" on either side of the weld. Depending on the grade of aluminum you can loose 40% of the strength in the heat affected zone. Nothing to worry about but that is why 95% of the time the crack is beside the weld rather than though the weld.
Some manufactures only warranty the welds and not the whole hull on their boats for this reason.

I would take out the plates. Then reinforce the frames by putting 3/16" or 1/4" doublers plate on the vertical sides of the frames.
For the deck plates you could replace them with channel or weld flat bar under the old plates (watch out the flat bars don't go where a bolt may land) or bend the the old plates into a channel shape.
Clean the plates with SS wire brush or grinder (we like Walter's 15L-506 wheels). Bevel the top edge so you get a full penetration weld across the top. The vertical weld of the flat bar or channel to the doubler plates on the frames will ad strength as well.

I am a big believer of drilling and threading. When you put these plates/channels back in put them in 1/4" - 1/2" lower and then weld a 1/4" - 1/2 plate on top of them. Once you get the plywood on you can mark out, drill and thread the corresponding holes in these plates.

One final note you can make the repair last longer by attaching the T Top to the console where ever possible and distributing the load.

Sincerely
John
Ironwood Boats
IN2DEEP
WON Super Star Donator '08, '09, '10, '11
Posts: 638
Joined: Sat Mar 15, 2008 1:07 pm
16
Location: So. Calif.

Deck repair

#18

Post by IN2DEEP »

"A little about aluminum welding strength.
The weld failed because it is a one sided weld on a plate that is flexing. If it was welded on the bottom also it may have taken longer to crack but the weld would not have failed. The crack would be beside the weld rather than though the weld. This is because aluminum looses its strength when welded. This area beside the weld is called the heat affected zone and for engineering is an area 1" on either side of the weld. Depending on the grade of aluminum you can loose 40% of the strength in the heat affected zone. Nothing to worry about but that is why 95% of the time the crack is beside the weld rather than though the weld. "


I agree with this 100% from personal experience with my Bayrunner.
I have much more faith with separate brackets in conjunction with either tapped threaded holes (if thick enough) or a threaded backing plate or thru bolted with SS bolts with nylon lock nuts.
I probably feel this way because I don't weld but can drill holes and make brackets :oops:

I'm guessing around a 22 kt. cruise speed
30 kts balls out, but I may be wrong :roll:

Scott
Image
1989 22' Walkaround Cuddy Bayrunner
2001 115 Merc. 4 stroke/1988 9.9 Yamaha 4 stroke kicker
Ironwoodtuna
Donator '09 '10
Posts: 510
Joined: Wed Jan 09, 2008 9:27 pm
16
Your location: NY
Location: Montauk, NY

WELCOME JOHN TAYLOR!

#19

Post by Ironwoodtuna »

Hey Everybody,

I am really glad to see my builder, Mr. John Taylor from Ironwoodboats.com on here.

As you can already see by this first couple of replys, John knows aluminum. I trust that he will bring all of his knowledge of aluminum and help everyone here on the site.

Welcome John, you make a nice addition to the team.

Marty
ImageImage
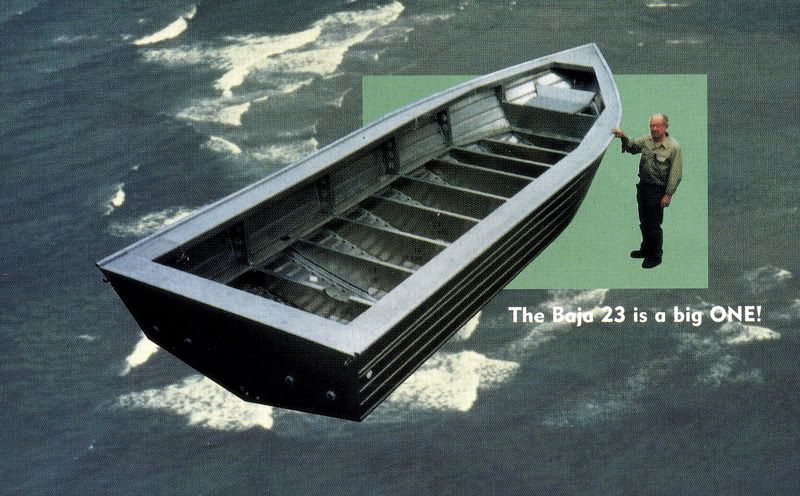
"IRONWOODTUNA" the Alloy Sportfisherman Battleship!
Merlin
Posts: 146
Joined: Sun Feb 10, 2008 6:50 pm
16
Location: southern baja

#20

Post by Merlin »

Again, thanks for the input. But, please, be easy on my old gal. These are time-tested boats that hold up well in the ocean - there are lots of them around - even older than mine - that are still charging. This is the second one I've owned and I'm very happy to call her mine. All boats suffer fatigue and require repair and I appreciate all the helpful advice.

In my opinion, the popped welds were caused by a poorly designed and constructed T-top that exhibited undue force in one area. The best advice, and part of my plan from the beginning, is to distribute the load. Adding the back legs to the T-top and more connections to the console to reduce flex was the first stage.

Now, I'm on to the floor. We made solid NON ALLOY floor panels - no more rot! They turned out great and they are going to be a lot stronger than the plywood. Now getting some kind of connection under the floor plates would be fantastic but without a qualified welder I'm hesitant to cut the existing welds. I can't slide any thing under without cutting and removing the foam and, believe it or not, the foam actually provides some support for the floor plates. That leaves me with two thoughts:

I can lag bolt through the NON ALLOY floor panel into the floor plate creating a connection to the boat.

or

I can use T-nuts epoxied into the NON ALLOY floor panel and use 5200 to create a connection to the floor plates.

Any thoughts?

All the best and thanks again for all the great advice!
Merlin
Posts: 146
Joined: Sun Feb 10, 2008 6:50 pm
16
Location: southern baja

#21

Post by Merlin »

Oh, sorry, she cruises at 24 and tops out at 37 mph on the GPS.

That being said, she rides well but I don't hammer her when it's rough. I don't know how the previous owner treated her but I want her to last. She can handle quarter and down swell extremely well but up into it is rough - the trade off with a light boat. I'm adding trim tabs, that should help. I always notch it back when it's rough out.
Bullshipper
Posts: 199
Joined: Tue Jan 08, 2008 11:53 pm
16
Location: Mexico

#22

Post by Bullshipper »

Aluminum is not hard to glue if clean, and is standard on most southern cross boats.

You have 3 options IMO

Gluing down composite panels to the aluminum with welded studs to bolt down your tee top.

Same idea using 3/4" CDX Marine ply encapsulated in plywood with backing plates for bolts, glued down to alum.

Welding 3/4" square tube stock on 10" centers on top of existing floor to provide proper support then gluing down 1/8" 5052 checkered plate to top surface of tubes and placing a bead to join plate to hullsides.

The flat plates on the floor are useless to provide floor support for a thin aluminum checkered plate so unless you want to reinforce this as suggested, the thicker cdx is probably the best opotion for a baja repair.

Aluminum extrusions and plate will cost you a lot to import into Mexico.
Ironwood Boats
Posts: 31
Joined: Fri Apr 18, 2008 11:21 am
16
Location: Vancouver BC
Contact:

#23

Post by Ironwood Boats »

Sorry for the rough up on the boat. Up here a boat built with .080 used 200 hours a years on the Pacific would not make it to it's second 200 hours.

I think the lag bolts will work loose. Threads are too course. Don't put Galvanized metal into aluminum.

Your second ideas is better 5200 is great stuff. I just hope you don't need to get the floor panel up any time soon because they will not come up in one piece. Clean the aluminum with 40 or 80grit sand paper first.
To add a bit more strength to the plates you could bolt some angle between the frame an the plates. You would need an angle dill and will have to remove some of the foam to do this.

I fixed a a fiber glass inflatable that had the threaded inserts pulled out of the deck.
We tried to glue the SS insets back in with epoxy in but it only lasted one season. Probably too much grim already in the holes.

The way we finally fixed it was to cut a 1/4" plate that was large enough to pick up the console as well as the T Top.
First we masked out the area the 1/4" plate was going to cover.
Then we ground both the NON ALLOY deck and the aluminum with 40 grit sand paper.
We used 3M 5200 to glue the aluminum to the NON ALLOY deck.
Double stacked 5 gallon pails of water squeezed the plate down.
We then drilled and tapped the holes for the console and T Top. We used 1/4 bolts into the 1/4" plate.
You can use the 5200 on the threads and you will be able to get the bolt out later.

One final note try and keep the top of the fuel tanks clear to allow air movement around them. This will prevent electrolysis.


Sincerely
John
Ironwood Boats
IN2DEEP
WON Super Star Donator '08, '09, '10, '11
Posts: 638
Joined: Sat Mar 15, 2008 1:07 pm
16
Location: So. Calif.

#24

Post by IN2DEEP »

I found some old brochures on Valco Bayrunners
These might help to give Merlin some advise.

Image

Image

Merlin,
A little bit of info might help us give you the best advice for the repair.

What kind of machinery do you have to work with?
-Bandsaw, Sawzal or jig saw, hacksaw?

-Drill press or hand drill motor?

-Decent set of drills and a 1/4-20 tap

-Access to the needed raw materials: 1/4" aluminum plate and possibly 3/16" or 1/4" thick aluminum angle?


So guess you didn't like my idea on how to get the foam out to perform the repairs.
And it sounds as if you don't plan on doing any welding? -repair with aluminum angle

How stiff are the new NON ALLOY floors?

Are they 1/2" thick just like the wood floors were?

I feel that you should be utilizing the floor mounting plates even though they seem flimsy
Once pulled tight against the glass floor, they will be as stiff as the floor itself and alleviate some of the load (front to back, left to right) off the self tapping screws that hold down the floor panels (Those seem to back out and strip anyways)
Try to avoid anything sticking up above the plain of floor mounting areas or plan on relieving those areas out on the backside of your new floors

I'd still use backing plates mounted on the underside of the floor plates that can be drilled and tapped from the topside
Watch out for that NON ALLOY dulling your drills pretty quickly :shock:

BTW, you won't have any regrets about installing trim tabs on your boat
Install the widest ones that will fit :wink:

Scott
Last edited by IN2DEEP on Mon Apr 28, 2008 7:56 pm, edited 2 times in total.
Image
1989 22' Walkaround Cuddy Bayrunner
2001 115 Merc. 4 stroke/1988 9.9 Yamaha 4 stroke kicker
AlloyToy
Donator '08 '09 '10
Posts: 2433
Joined: Wed Jan 09, 2008 8:55 am
16
Your location: Mass
Location: MA & RI

#25

Post by AlloyToy »

Is that the boat that one of the guys ran in the East vs. West shark tourney out of Marina Del Ray? He was the only one with an alloy boat, and it looked something like that.

Nice.......I like!!
Post Reply Previous topicNext topic